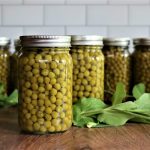
Canning Peas
Pressure canning peas is makes them shelf stable for year round enjoyment right out of the jar.
Servings: 1 Yield varies, see notes
Equipment
- Pressure Canner
Ingredients
- Garden Peas shelled (See notes for quantities)
- Water
- Salt optional
Instructions
- Start by shelling the peas if they're not already cleaned and shelled. See notes for quantities.
- Prepare a pressure canner by adding 2-3 inches of water to the bottom and preheating it to around 140 degrees. Follow the instructions in your pressure canner manual for setup. (See notes for hot pack, I'm providing raw pack instructions here.)
- Bring a kettle of water to a boil on the stove. You'll need around 1 to 1 1/4 cups of boiling water for each pint jar.
- Load shelled peas into canning jars, either pints or quarts, leaving 1 inch headspace. Do not pack them down, just let them settle naturally.
- Pour boiling water over the peas in the canning jars, maintaining 1 inch headspace.
- Seal the jars with 2 part canning lids to finger tight and then load them into the prepared pressure canner.
- Close the lid of the pressure canner and turn the heat up to high. It will take some time for the pressure canner to reach boiling. Once it's boiling, allow it to vent steam through the pressure valve for 10 minutes before adding the canning weight and bringing the canner up to pressure. The pressure is 10 psi for a weighted gauge canner below 1,000 feet, see notes for other elevations and canner types.
- Once the canner reaches pressure, set a timer for 40 minutes. The time is the same regardless of the elevation and jar size (don't use jars larger than quarts).
- Maintain the pressure for the allotted time, and then turn off the pressure canner once the time is complete. Allow the canner to cool completely before removing the canning weight and unsealing the lid. (Do not attempt to speed the cooling process, just allow it to cool naturally.)
- Check jar seals and store any unsealed jars in the refrigerator for immediate use. Properly canned and sealed jars will keep on the pantry shelf for 12-18 months without losing quality.
Notes
Peas are a low acid vegetable and must be pressure canned. Do not attempt to water bath can peas, as it's not safe. If you're not familiar with pressure canning, please read my beginner's guide to pressure canning before beginning.
Pressure Canning Times and Pressures
The canning time is always 40 minutes, regardless of altitude or jar size. Do not can peas in jars larger than quarts. For a dial gauge pressure canner, the pressure is as follows:- 0 to 2,000 Feet use 11 pounds pressure
- 2,001 to 4,000 Feet use 12 pounds pressure
- 4,001 to 6,000 Feet use 13 pounds pressure
- 6,001 to 8,000 feet use 14 pounds pressure
- 0 to 1,000 Feet use 10 pounds pressure
- Above 1,001 Feet use 11 pounds pressure
Quantity and Yield
- 20-ish pounds of peas (in shell) for a 9-pint canner batch
- 30 to 32-ish pounds of peas (in shell) for a 7-quart canner batch
Raw Pack v. Hot Pack
Both raw pack and hot pack are acceptable canning methods. I've tried both, and you cannot tell the difference in a blind taste test of the finished product. Raw packing is easier, so I've given those instructions above. If you prefer to hot pack for whatever reason, blanch the peas for 2 minutes in boiling water before packing into canning jars and topping with boiling water. Either the blanching water or fresh boiling water from a kettle works fine. Prepare the canner by preheating to just barely simmering (around 180 degrees), instead of the cooler temperature that's used for raw pack (around 140 degrees, or very hot to the touch, but no where near boiling). This temperature difference helps more closely match the temperature of the jars going into the canner and reduces the risk of thermal shock to the jars.Nutrition
Serving: 0.5cup prepared | Calories: 72kcal | Carbohydrates: 13g | Protein: 4g | Fat: 1g | Saturated Fat: 0.1g | Polyunsaturated Fat: 0.3g | Monounsaturated Fat: 0.1g | Sodium: 229mg | Potassium: 131mg | Fiber: 4g | Sugar: 4g | Vitamin A: 1896IU | Vitamin C: 10mg | Calcium: 25mg | Iron: 2mg
