Growing Grapes from Cuttings
Growing grapes from hardwood cuttings is a simple and cost-effective way to propagate new vines. By using dormant wood from pruned grapevines, you can easily grow new plants with a high success rate, making it an ideal method for home gardeners looking to expand their grape patch.You can also grow grapes from greenwood cuttings harvested in the summer months, and that process is described in the notes.
Equipment
Ingredients
- Dormant grapevines (from fall or winter pruning)
- Rooting hormone Optional, but recommended
- Potting Soil
Instructions
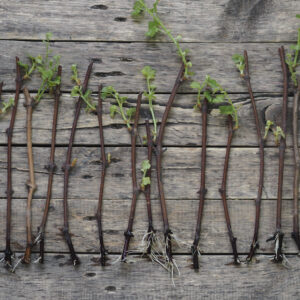
- Select the Right Cuttings: Choose healthy, mature wood that is 12-18 inches long and includes at least three buds.
- Prepare the Cuttings: Trim the cuttings, removing any leaves, and dip the cut end in rooting hormone.
- Plant the Cuttings: Place the cuttings 2-3 inches deep in moist potting soil.
- Maintain Moisture and Temperature: Keep the soil moist but not soggy. Place the pots in a warm, humid spot.
- Wait for Roots: Roots should begin to form within a few weeks. Once established, transplant the young vines into larger pots or into the garden.
Notes
Tips for Success with Hardwood Cuttings
While propagating grapes from hardwood cuttings is one of the easiest methods, there are a few tips that can significantly increase your success rate:- Select Healthy, Mature Wood: Choose wood from a healthy grapevine that is 1-2 years old. It should be firm and slightly bendable, not brittle or overly green. The best cuttings are typically taken from the middle of the vine, rather than the very tip or base.
- Cut Cleanly and Sharply: When taking cuttings, use a sharp, clean knife or pruning shears. A clean cut reduces the risk of introducing disease or pests. Make sure the cut is straight to maximize the surface area for root growth.
- Ensure Adequate Buds: The cutting should have at least 3-4 buds to increase the chances of successful rooting. The more buds you have, the higher the chance that at least one will sprout and develop into a healthy plant.
- Avoid Over-Drying: After taking the cuttings, store them in a cool, moist environment until you're ready to plant. If they dry out too much before planting, they are less likely to root successfully. Wrapping cuttings in a damp cloth or placing them in a plastic bag can help preserve moisture.
- Callus the Cuttings: If you're storing your hardwood cuttings for any period before planting, consider callingusing them. This process encourages the cut ends to develop healing tissue, which promotes faster and more reliable root development. Be cautious, however, as too much heat or moisture can cause the cuttings to rot.
- Use Rooting Hormone: While not strictly necessary, dipping the cut ends of your hardwood cuttings into rooting hormone can greatly boost success rates. Rooting hormones stimulate root growth and increase the chances of the cutting successfully establishing roots.
- Ensure Proper Planting Depth: Plant your cuttings about 2-3 inches deep in moist, well-draining soil. Make sure the cutting is buried with at least one bud beneath the soil surface.
- Maintain Consistent Moisture: Keep the soil consistently moist, but not soggy, during the rooting process. Avoid letting the soil dry out completely. Regularly misting the surface can help maintain humidity levels and keep the cutting from desiccating.
- Provide Temperature Control: Hardwood cuttings root best when the soil temperature is between 60°F and 70°F (15°C-21°C). If temperatures are too cold or too hot, rooting success may decrease.
- Patience is Key: Rooting from hardwood cuttings can take several weeks to months. Be patient and don’t be discouraged if it takes time for roots to develop. As long as the cutting stays healthy, it’s likely to take root eventually.
Tried this recipe?Let us know how it was!
