Canning Beef
Canning beef in a pressure canner is an easy way to preserve meat without taking up freezer space, and it's perfect for emergency preparedness or busy weeknight meals.
Ingredients
- Beef Either cubed chunks or ground beef
- Canning Liquid Water, Broth or Tomato Juice
Instructions
- Prepare a pressure canner according to the manufacturers instructions. For most models, this means adding 2-3 inches of water in to the bottom, along with the bottom trivet and then bring it up to a gentle simmer (180 degrees F).
- Brown all meat, whether it's ground beef, beef cubes or beef strips. Remove the meat from the pan with a slotted spoon, straining out as much fat as possible.
- While the meat is browning, bring canning liquid to a boil and keep it hot. Water, broth and tomato juice are all options, but I generally choose homemade beef broth.
- Pack browned meat into prepared canning jars, either pints or quarts, leaving 1 inch headspace.
- Pour boiling canning liquid over the meat in the jars, still maintaining 1 inch headspace.
- Wipe rims and seal with 2 part canning lids to finger tight.
- Load the jars into your pre-heated pressure canner, seal the lid and allow steam to vent for 10 minutes.
- After steam has vented for 10 minutes, add the canning weight (for weighted guage) to allow the canner to begin coming up to pressure.
- Once the canner is at target pressure (see notes, as the target pressure varies based on your elevation), process the jars for 75 minutes for pints and 90 minutes for quarts.
- After the jars have processed, turn off the heat and allow the canner to cool completely. Once cool, unseal the canner and remove the jars.
- Check seals, remove rings and wash jars. Store any unsealed jars in the refrigerator for immediate use. Sealed jars should maintain quality on the pantry shelf for 12-18 months if properly pressure canned.
Notes
(It's important to note that beef must be pressure canned, and cannot be canned in a water bath canner. If you're not familiar with pressure canning, I'd strongly suggest reading this beginner's guide to pressure canning before you get started.)
In this recipe card I'm presenting the best way to make high quality canned beef at home, hot pack pan browned beef packed in liquid. Other methods, including raw pack and no added liquid variations are discussed in the original article, and while they are approved canning methods, they're not methods I recommend because they sacrifice quality for convenience.
The instructions are the same whether you're canning chunks or strips of beef, or loose pack ground beef crumbles.
Yield: I've found that it takes roughly 3/4 lb raw beef to fill a pint jar, and around 1 1/2 to 1 3/4 pounds beef per quart jar. This is true regardless of canning method, though I only recommend hot pack. The meat is weighed while raw, either from the store or from your own home processed fresh beef.
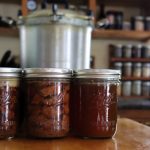
Beef Fat in Jars: Please be aware that fat at the top of the jars is completely normal, especially with ground beef and hamburger. During browning, try to remove as much fat as possible so that the fat within the jar isn't too excessive, but a solid fat cap is not abnormal depending on the type of beef used.
"Excessive" fat within the jar can sometimes bubble out during canning and get into the seal, preventing jar seals. I've never had this happen, but it's something to watch.
Canning Beef Broth: To can simple beef broth without meat included, simply make the broth and filter out the solids. Return the stock to a boil and ladle into canning jars leaving 1 inch headspace. The total canning time is substantially less when it's just broth rather than broth and meat. Process in a pressure canner for 20 minutes (pints) or 25 min (quarts).
Altitude Adjustments for Pressure Canning Beef: Altitude adjusted pressures for beef chunks, ground beef and stock are all the same, but actual pressures vary slightly depending on the type of canner used:
Weighted Gauge Canner:
- Under 1,000 Feet Elevation Use 10 lbs
- Over 1,000 Feet Elevation use 15 lbs
- 0 to 2,000 Feet Elevation Use 11 lbs
- 2,001 to 4,000 Feet Use 12 lbs
- 4,001 to 6,000 Feet Use 13 lbs
- 6,001 to 8,000 Feet Use 14 lbs
