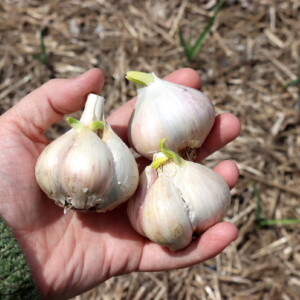
How to Plant Sprouted Garlic
Step-by-step instructions for planting sprouted pantry garlic in spring to grow a full harvest of garlic bulbs by late summer.
Equipment
- Trowel
Ingredients
- Sprouted garlic bulbs
- well-amended garden soil
- compost
Instructions
- Peel off the loose papery outer layer of the sprouted garlic bulb to expose the individual cloves. Don't peel the cloves themselves, just enough of the outer wrapper to separate them cleanly.
- Break the bulb gently into individual cloves, being careful not to damage the green sprout that's already pushing out from the top. Leave the outer paper on each individual clove for protection during planting.
- Choose a garden bed with full sun and well-draining soil. Work in 2 to 3 inches of finished compost before planting, since garlic is a heavy feeder that thrives in rich soil.
- Plant individual cloves 6 inches apart in rows about 12 inches apart, with the pointed sprout end up and the basal end pointed down. Aim for 1 to 2 inches of soil over the top of the clove, putting the bottom of the clove about 3 to 4 inches deep.
- Mulch the bed with 1 to 2 inches of straw or shredded hardwood leaves to keep the soil cool, suppress weeds, and conserve moisture during the early growth period.
- Water deeply after planting and keep the bed consistently moist (not waterlogged) for the first few weeks while the cloves establish their root systems.
- Once plants are growing actively, reduce watering to about 1 inch per week. Garlic prefers cool, evenly moist soil, but shouldn't sit in waterlogged conditions.
- If you're growing hardneck garlic varieties, trim off the curling flower stalk (called a garlic scape) when it appears in late spring or early summer. Removing the scape directs the plant's energy into bulb development rather than seed production. The trimmed scapes themselves are delicious in stir-fries, pesto, or compound butter.
- Stop watering about 2 weeks before harvest to let the bulbs cure in place and develop firm wrapper layers. The harvest signal is when the bottom 2 pairs of leaves have yellowed and dried while the upper leaves are still green.
- Lift the bulbs gently with a garden fork rather than pulling by the tops, which can break and damage the bulb. Brush off loose soil but don't wash the bulbs.
- Cure the harvested garlic by laying it in a single layer in a shaded spot with good air circulation for 2 to 4 weeks, until the outer wrapper is completely papery and the neck is dry and tight.
- Once fully cured, trim off the dried tops and roots, then store the bulbs in a cool, dry, dark spot with good air circulation. Properly cured garlic stores for 4 to 6 months in pantry conditions.
Notes
Notes for the how-to card:
Sprouted pantry garlic from any source can be planted, including grocery store garlic, though most grocery store garlic is softneck and won't produce a scape. Hardneck varieties from a farmers market or seed catalog will send up a scape that needs trimming for best bulb development.
Plant in spring as early as the soil can be worked, ideally 4 to 8 weeks before your last expected frost date. Garlic prefers cool weather and tolerates light frost without damage.
If your garlic sprouts in midwinter when the ground is still frozen, plant the cloves in a deep pot indoors and tend on a sunny windowsill until the ground thaws. Transplant outdoors once the soil can be worked.
Spring-planted garlic harvests a few weeks later than fall-planted garlic and may produce slightly smaller bulbs, but still grows into full, usable garlic ready for harvest the same year.
For best storage, choose hardneck garlic varieties for short-term storage (4 to 5 months) and softneck varieties for longer storage (up to 9 months under ideal conditions). In humid or hot climates where bulb storage is unreliable, preserve excess garlic by pickling, freezing, or fermenting in honey.
Sprouted garlic is also perfectly safe to eat fresh. The flavor is milder than cured garlic, with a green-onion quality that works well in any recipe where garlic gets cooked. Use sprouted garlic within a week or two of sprouting if you're not planting it, since it doesn't store well once dormancy is broken.
Tried this recipe?Let us know how it was!
