Affiliate disclosure: This post may contain affiliate links. Please see our Privacy Policy.
Canning bone broth is a practical way to preserve homemade stock while saving freezer space and money. You can use scraps like bones roasted bones and simple vegetables to create a rich, nourishing broth. Once you start pressure canning your own bone broth, you’ll always want a shelf full in your pantry.
Canning bone broth at home is one of the simplest pressure canning projects for beginners. Not only does it help you make use of every part of the animal, but it also gives you instant access to shelf-stable, protein-rich broth all year long—without relying on store-bought cartons.
While many people assume bone broth is high in minerals, the real value is in the protein content. A long-simmered pot of bone broth contains gelatin and collagen, which support joint, gut, and skin health. It’s no wonder health advocates have started recommending a warm mug of bone broth instead of coffee.
If you’re looking to preserve a large batch of homemade stock or bone broth, pressure canning is the safest and most practical method.
Why Can Bone Broth?
You’ve probably seen “artisanal” bone broth on the shelves for as much as $8 a pint. But traditionally, bone broth was a way to use up scraps—especially bones that would otherwise go to waste. If you’re making broth from leftover roast chicken, turkey carcasses, beef bones, or pork necks, the raw materials are practically free.
So why can your own bone broth?
- Cost Savings – A single home-canned batch can save you hundreds. We can over 200 quarts of broth each year—worth nearly $3,000 if we bought it retail.
- High Quality – Control every ingredient, especially if you raise your own animals or buy organic, pasture-raised meat. Homemade means no preservatives, additives, or hidden sodium.
- Customization – Add garlic, herbs, or mushrooms to suit your taste. Make low-sodium, no-salt, or allergen-friendly versions for your family’s needs.
- Self-Reliance – Having home-canned broth on hand is a huge asset during power outages, flu season, or busy weeknights. Just pop the lid and use it in soups, sauces, or for sipping.
Whether you’re preserving stock from a whole Thanksgiving turkey or putting up weekly scraps, canning bone broth is a satisfying and sustainable kitchen project. It saves money, reduces waste, and gives you instant access to nourishing broth for soups, stews, and sipping.
If you’re serious about self-reliance or just tired of paying steep prices for store-bought broth, pressure canning is the way to go. Once you get started, you’ll never go back.
Equipment You’ll Need for Canning Bone Broth
Bone broth is a low-acid food and must be pressure canned to ensure safety. Here’s what you need:
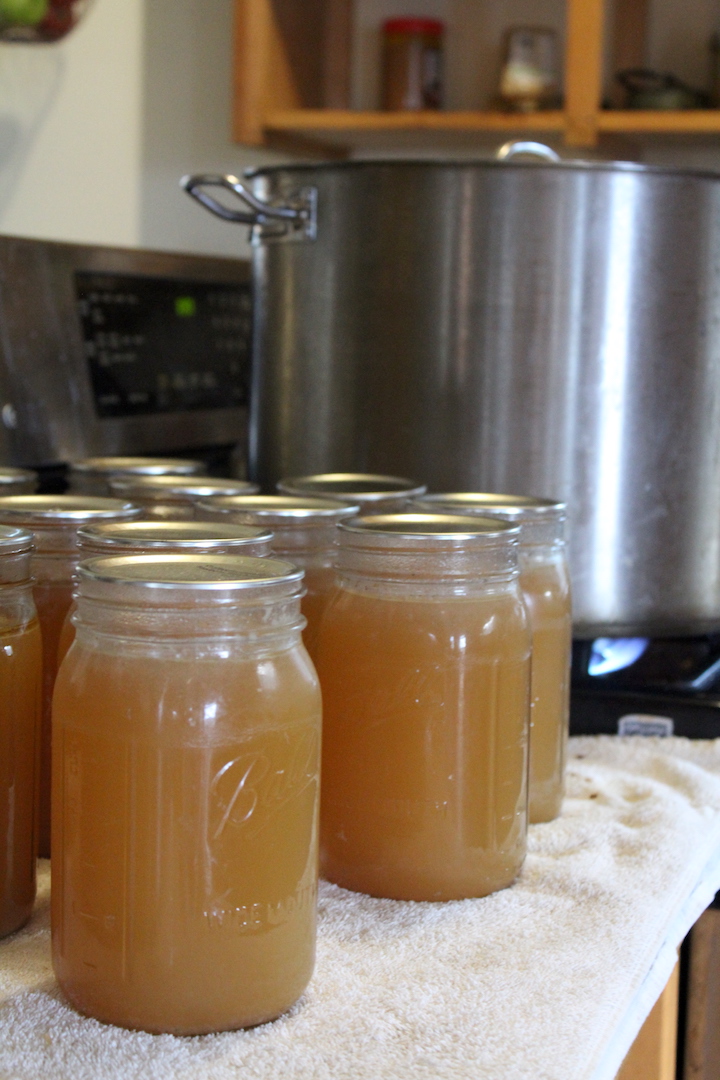
- Pressure Canner – We use a 30-quart All-American pressure canner, which holds 19 pints or 14 quarts. Larger models like the 41.5-quart version can process even more at once. This is a lifetime investment—and it pays for itself fast.
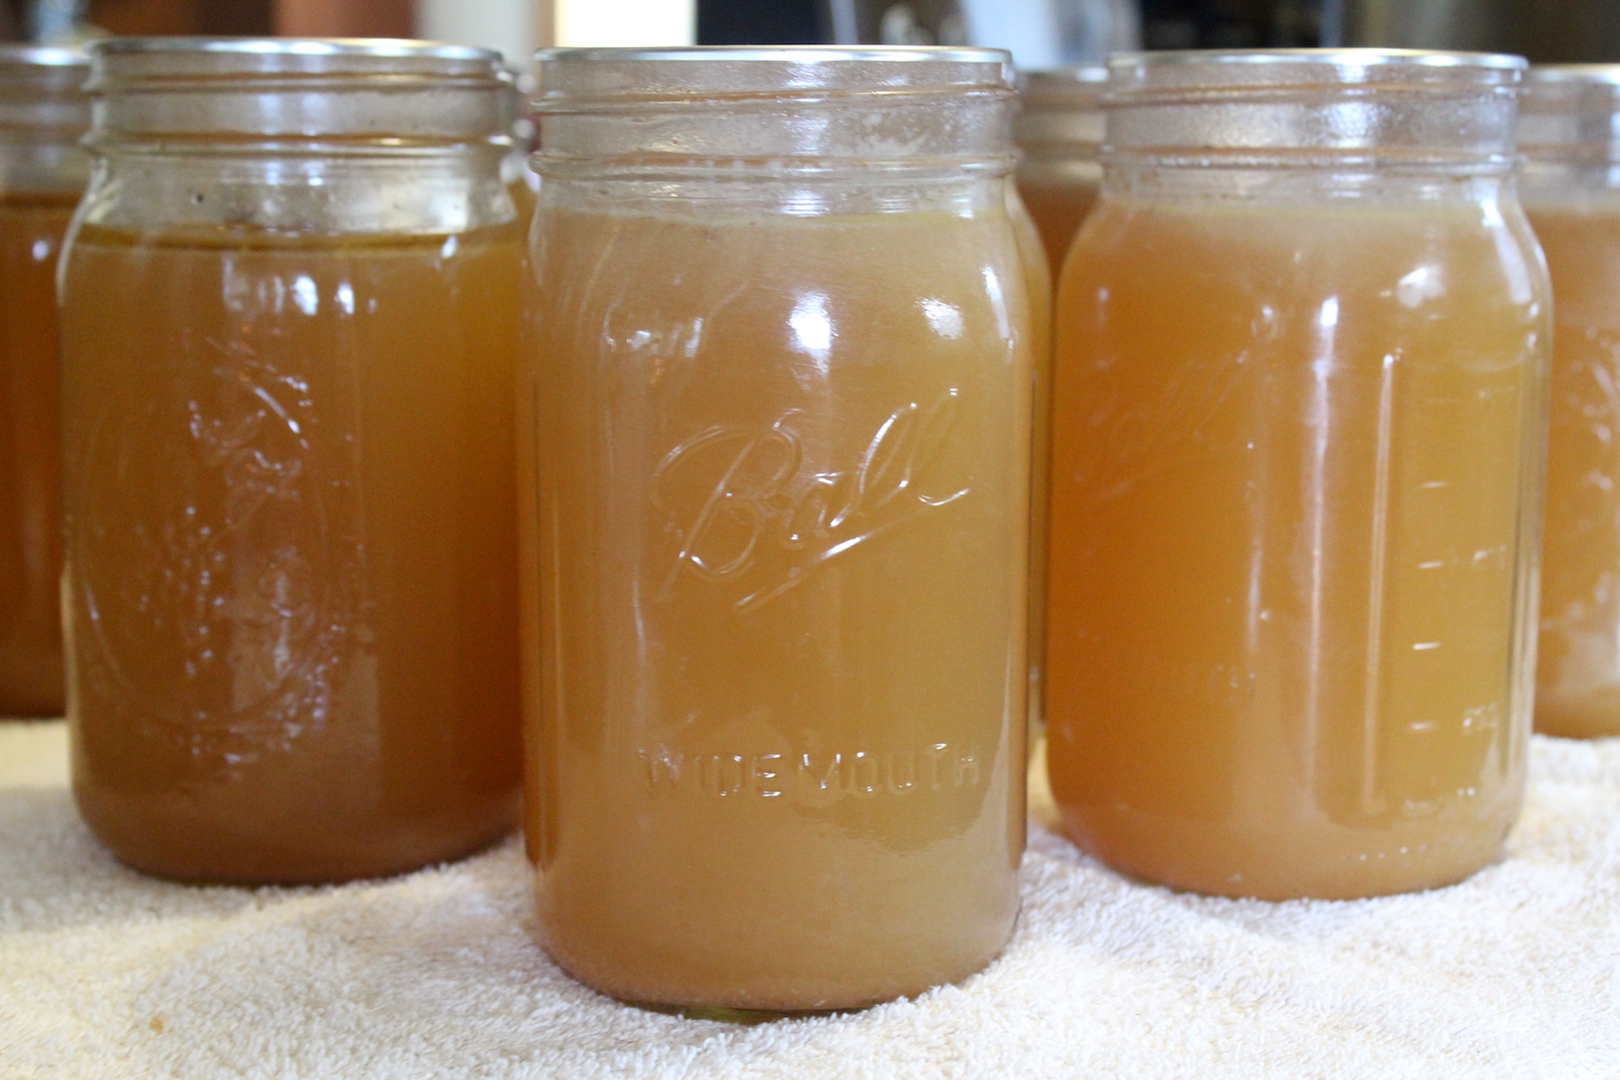
- Mason Jars – Bone broth can be canned in pints or quarts (not half-gallons). Narrow-mouth jars allow you to fit more per batch in a pressure canner, but wide-mouth jars are easier to clean and fill.
- Canning Lids and Rings – Single-use lids are the only major recurring cost. We buy them in bulk for discounts. Rings are reusable and last for years.
- Canning Jar Lifter – Essential for safely placing hot jars in and out of the canner.
- Wide Mouth Funnel – Helps keep jar rims clean and ensures consistent headspace. Bonus if it has measurement lines built in.
Making Bone Broth for Canning
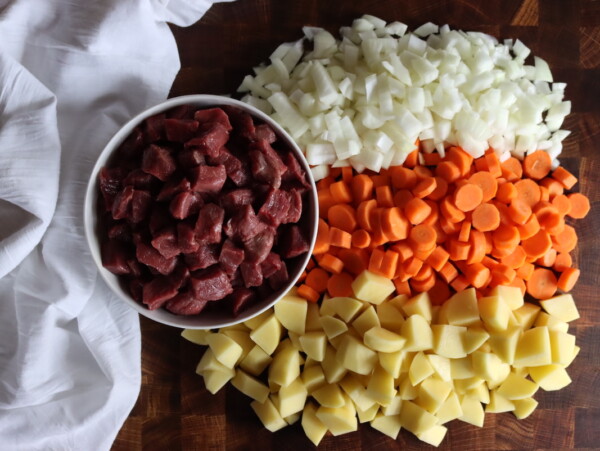
Before you can bone broth, you need to make it. Here’s how we prepare our broth for pressure canning:
- Collect Bones – We freeze bones from meals until we have enough to fill our 5-gallon stockpot halfway (roughly 2 to 3 gallons of bones).
- Roast (If Needed) – If the bones are raw, roast them in the oven at 425°F for 30–45 minutes to enhance flavor.
- Add Aromatics – Toss in 2–3 onions, 4–5 carrots, and a few cloves of garlic. You can also add celery, leeks, or herbs.
- Fill with Water – Cover everything with water, leaving about 2 inches at the top of the pot.
- Simmer – Bring to a boil, then reduce to a simmer for 8–24 hours. The longer you cook it, the more collagen you’ll extract.
- Strain – Remove solids using a colander, then strain again through a fine mesh sieve.
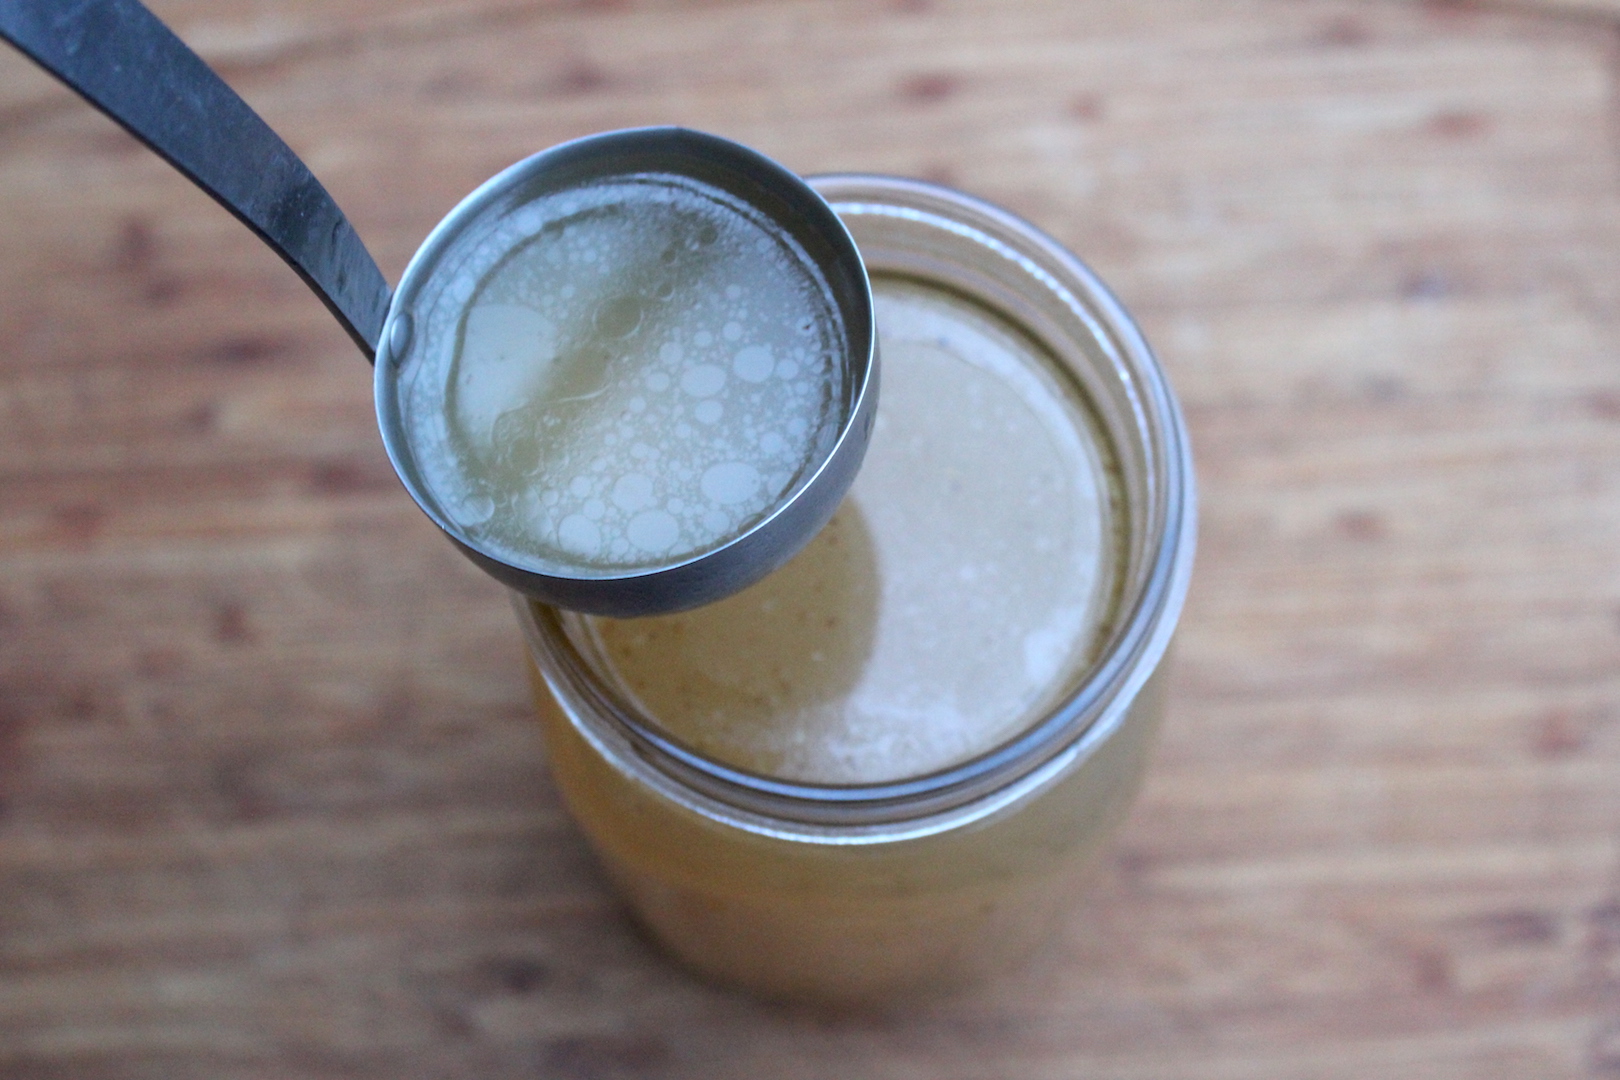
- Skim – If the broth has a thick fat cap, you can skim it after chilling. But if there’s minimal fat, you can skip this step and go right to canning.
Pressure Canning Bone Broth (Step-by-Step Instructions)
Here’s the basics:
- Method: Pressure Canning
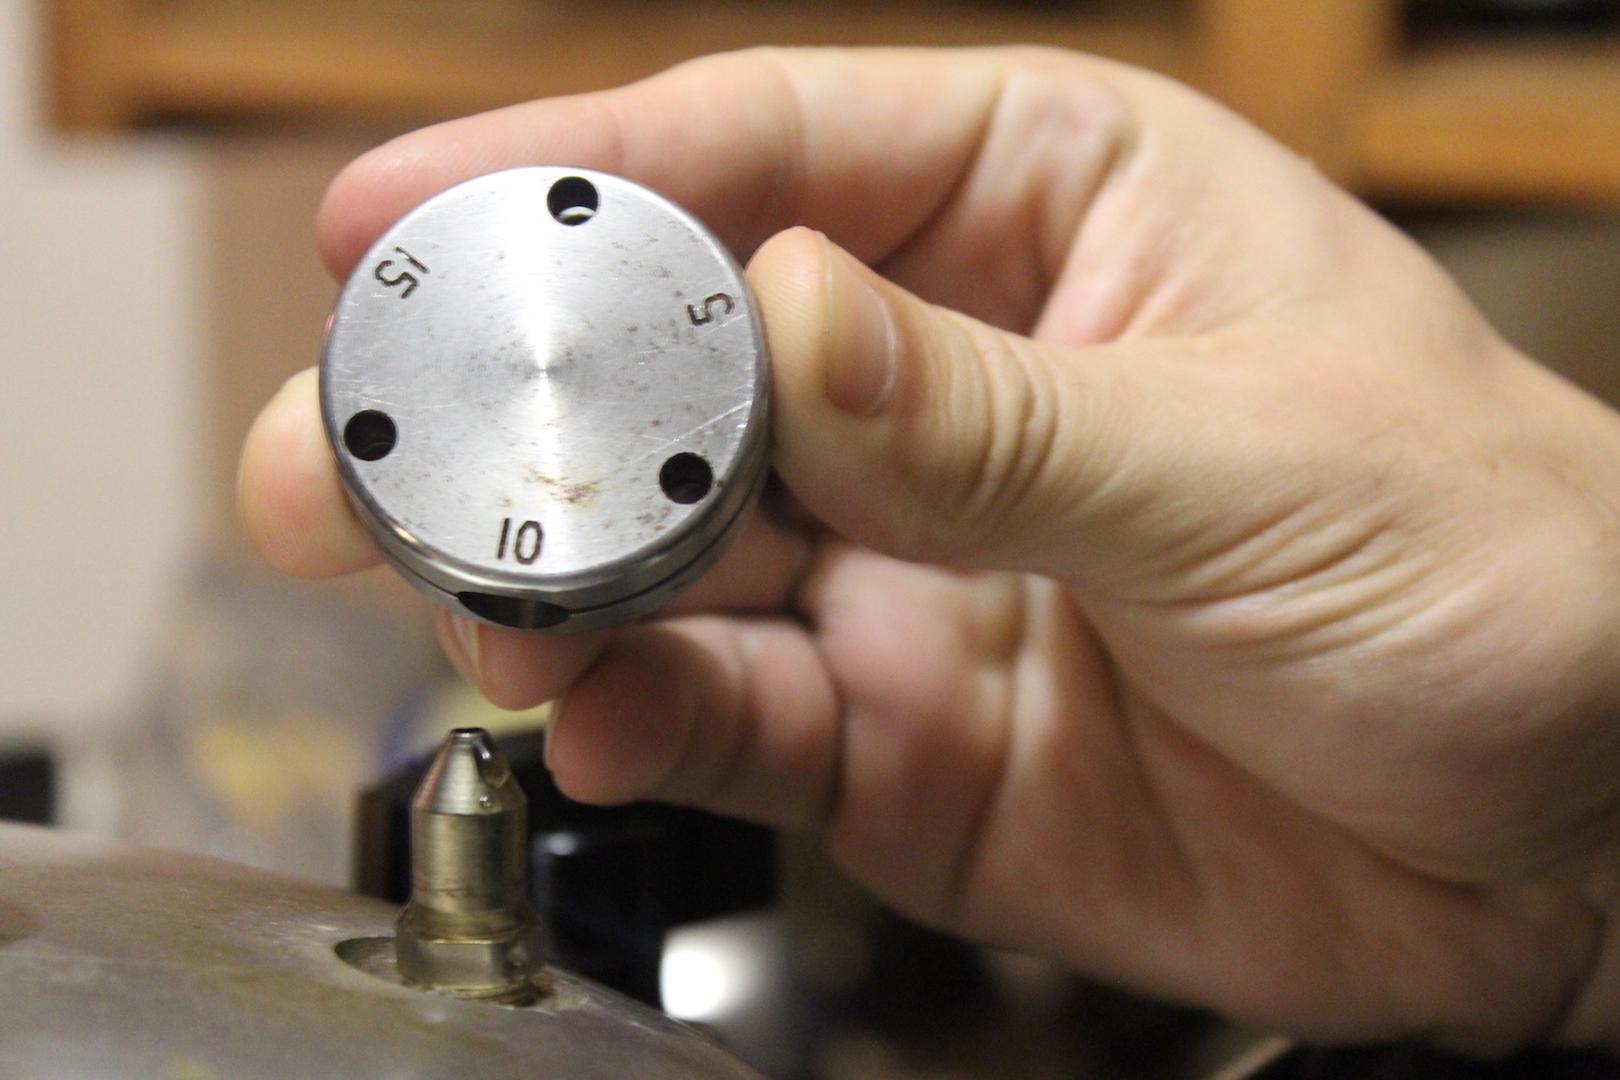
- Pressure: 10 lbs (weighted gauge) or 11 lbs (dial gauge) at altitudes under 1,000 ft
- Time: 20 minutes for pints and 25 minutes for quarts
- Headspace: 1 inch
Preparing for Canning
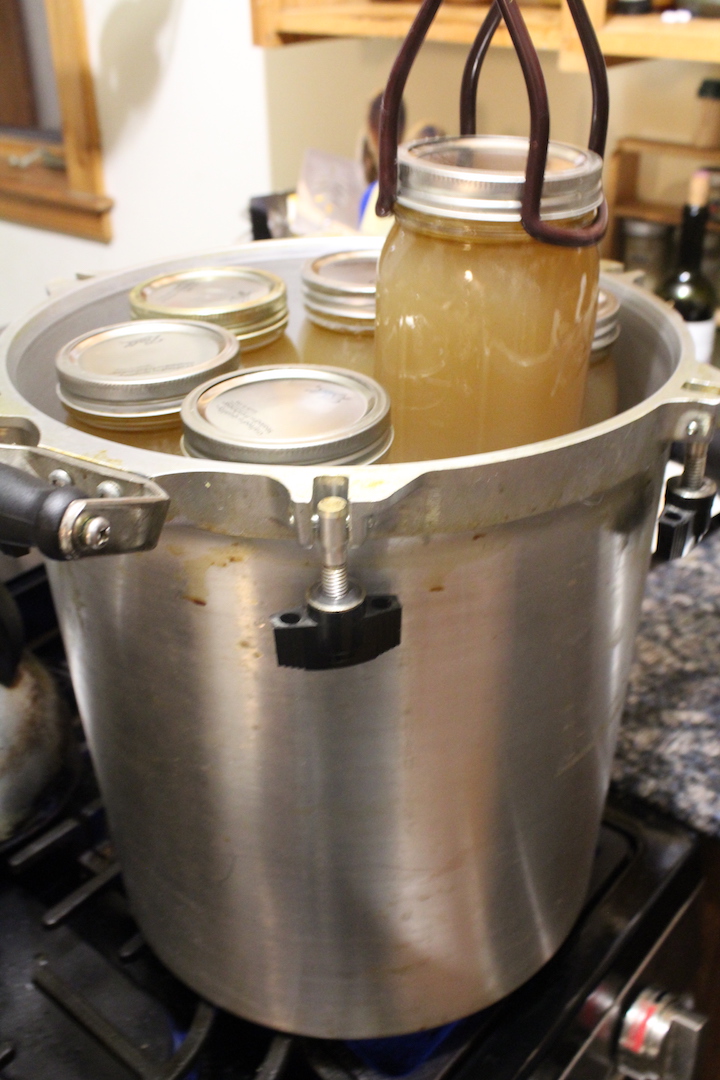
Start by bringing 2 inches of water to a boil in the bottom of your pressure canner. Place the bottom rack inside. On a separate burner, keep your strained bone broth hot but not boiling.
Ladle hot broth into hot, clean jars, leaving 1 inch of headspace. Wipe rims clean, apply new lids, and screw bands on finger-tight.
Use a jar lifter to load the jars into the pressure canner, spacing them evenly on the rack. If you have a two-tier canner, insert the divider rack and load the top layer.
Pressure Canning Process
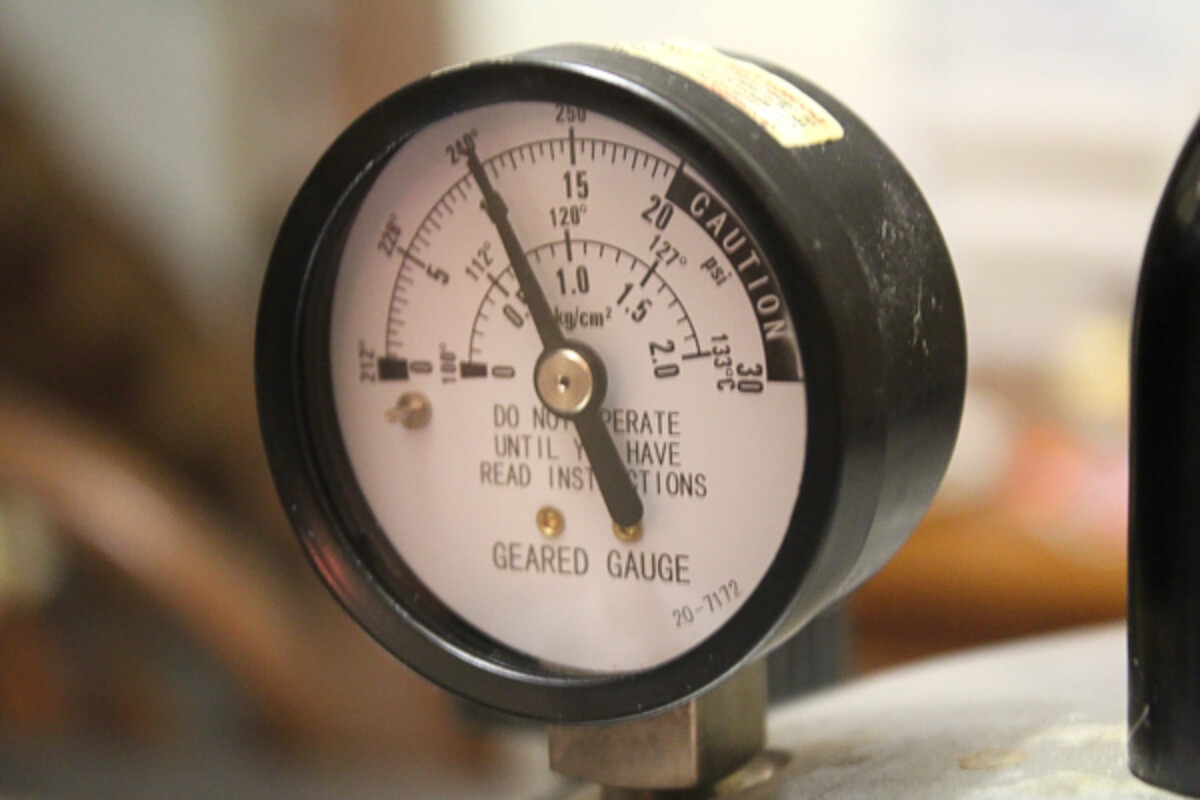
Secure the canner lid and bring it up to temperature. Allow steam to vent through the spout for a full 10 minutes before placing the weight.
Once the canner reaches pressure and the weight starts to jiggle, begin your minute timer. These are processed for 20 minutes for pints and 25 minutes for quarts.
After the timer ends, turn off the heat and let the canner depressurize naturally.
Don’t remove the weight or open the lid until the pressure gauge reads zero and the canner is cool to the touch—this may take an hour or more.
After Canning
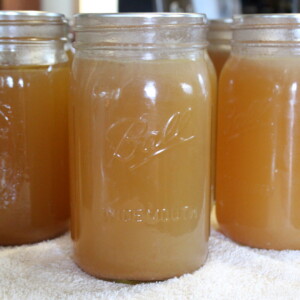
Use a jar lifter to remove the jars and place them on a towel to cool undisturbed for 12–24 hours. Once cool, remove the rings, check seals, and wipe down the jars.
Store your home-canned broth in a cool, dark place. Properly sealed jars are shelf-stable for at least 18 months, but they’re often good for years.
Pressure Canning Altitude Adjustments
With pressure canning, the processing times stay the same at higher altitudes, but the pressures change. Here are the altitude adjustments for pressure canning:
For dial gauge pressure canners:
- 0 to 2,000 feet in elevation – 11 lbs pressure
- 2,001 to 4,000 feet in elevation – 12 lbs pressure
- 4,001 to 6,000 feet in elevation – 13 lbs pressure
- 6,001 to 8,000 feet in elevation – 14 lbs pressure
For weighted gauge pressure canners:
- 0 to 1,000 feet in elevation – 10 lbs pressure
- Above 1,000 feet – 15 lbs pressure
Using Bone Broth
Home-canned bone broth is incredibly versatile and ready to use straight from the jar. Heat it up for sipping on cold days, use it as a base for soups and stews, or cook grains like rice, quinoa, or barley in it for added flavor and nutrition.
It also makes a rich base for gravies, sauces, risottos, and braises, adding depth to everything from weeknight dinners to holiday meals.
Canning Bone Broth
Equipment
- Pressure Canner
Ingredients
- 8 lbs bones, beef, chicken, turkey, pork, or mixed
- 3 medium onions, quartered (skins on for color if desired)
- 5 medium carrots, chopped
- 2 stalks celery, chopped (optional)
- 4 cloves garlic, smashed
- 1 tablespoon apple cider vinegar, optional, for flavor—not mineral extraction
- 1 bunch parsley, optional
- Water to cover, approximately 3 gallons
Instructions
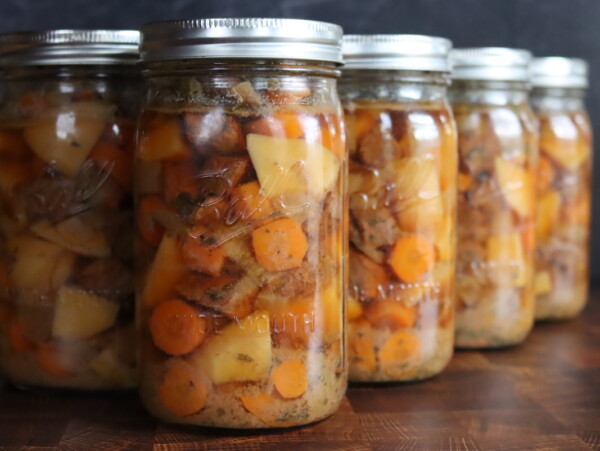
- Place the bones in a roasting pan and roast at 425°F for 30–45 minutes until browned (skip this step if using previously cooked bones). Transfer bones to a large stockpot (at least 16 quarts). Add the vegetables, garlic, herbs if using, and vinegar. Fill with water to cover the contents by 1–2 inches, leaving room at the top to prevent boiling over.
- Bring to a gentle boil over medium-high heat, then reduce to a low simmer. Simmer uncovered for 12–24 hours, adding water as needed to keep bones submerged. Strain through a colander, then again through a fine mesh sieve for a clear broth. Let cool slightly and skim fat if desired.
- Reheat strained broth to a boil. Prepare a pressure canner with 2 inches of simmering water and pre-warm 7 quart jars. Ladle hot broth into jars, leaving 1 inch headspace. Wipe rims, apply new lids, and screw on bands finger-tight.
- Load jars into the canner, vent steam for 10 minutes, then apply the weight. Process at 10 lbs pressure for 20 minutes for pints and 25 minutes for quarts(adjust for altitude if needed). Let pressure return to zero naturally before removing the weight. Open lid away from you, and let jars rest for 5–10 minutes before removing.
- Cool jars on a towel for 12–24 hours. Check seals, remove rings, and store in a cool, dark place.
Notes
Pressure Canning Altitude Adjustments
With pressure canning, the processing times stay the same at higher altitudes, but the pressures change. Here are the altitude adjustments for pressure canning: For dial gauge pressure canners:- 0 to 2,000 feet in elevation – 11 lbs pressure
- 2,001 to 4,000 feet in elevation – 12 lbs pressure
- 4,001 to 6,000 feet in elevation – 13 lbs pressure
- 6,001 to 8,000 feet in elevation – 14 lbs pressure
- 0 to 1,000 feet in elevation – 10 lbs pressure
- Above 1,000 feet – 15 lbs pressure
FAQ
No. Bone broth is a low-acid food and must be pressure canned to be shelf-stable. Water bath canning does not reach a high enough temperature to kill harmful bacteria in low acid foods (meats, veggies, etc). Waterbath canning is only used for acidic foods like jams and pickles.
Properly sealed jars stored in a cool, dark place will last at least 12–18 months. Many home canners safely use jars that are several years old, as long as the seal remains intact.
Yes, but it’s often better to leave the broth unseasoned and salt it when you use it. This gives you more flexibility for cooking and allows you to control sodium levels in your final dishes.
Absolutely. Mixed-bone broths from chicken, turkey, beef, pork, or even venison all work well. You can use what you have on hand—just be sure the broth is fully strained before canning. The only meat that’s not approved for canning as a broth is fish or seafood, but all land based animals are allowed.
That’s a good sign! Gelatin from connective tissue means your broth is rich in collagen. It will liquefy again when heated and makes for a deeply nourishing base.
Yes, broth freezes well. However, pressure canning saves freezer space, avoids the risk of thawing during power outages, and gives you shelf-stable broth that’s always ready to use.


I have considerable experience pressure canning bone broth. At the end of the last batch of chicken, the contents of the jars separated. Clear liquid on top, white, fatty looking stuff on the bottom of the jar. I have never seen this before and I have no clue why. I jarred 70 one quart jars and the last 25 looked like this. Any suggestions?
I’ve had that happen from time to time, and my best guess is that it’s proteins coagulating in the jar. I usually do it in 14 one quart jars (a single batch in my pressure canner) so I’ve never had it happen in just part of a big batch like that. When it happens, it’s all 14 jars or none.
My best guess is that it’s caused by cooking the broth too hot. They say if you make bone broth and let it boil hard, like really hard, during the process then it’ll never clear. I’ve found that to be the case and I try not to boil it hard. I have found that when occasionally it does by accident, the broth is cloudy as expected, but it also tends to have white fatty/slimy “stuff” at the bottom of the jars (and sometimes floating at the top). I believe, though I do not know for sure, that it is something about how the proteins are extracted from the bones/meat during cooking.
My best guess is that if it only happened at the very end of your last batch, then the stock got too hot near the end of the simmering extraction. That is to say, before canning but when the bones/meat are in the pot. Once it’s strained out it can boil hard, and does obviously when you can it. The main problem is just if it boils really hard with everything in there.
Hope this helps, it’s my best guess.
Hello, is 25 mins the time for pints and quarts?
You would only need to process for minutes for pints.
I have used my All American pressure canner on my glass top stove for a few years now and have had no problem whatsoever.
It’s good that you haven’t had any issues but it is possible to damage your stove in the process. It is advised to check with the manufacturer of your stove to see what their guidelines are. Here is an article from the National Center for Home Food Preservation with more information. https://nchfp.uga.edu/publications/nchfp/factsheets/smoothtops.html
I’ve saved many bones from past meals. Some of the chicken was cooked in sauce that had heavy cream and asiago cheese. Can I use these bones for the bone broth to be canned or should I separate them and only use plain bones for canning?
I have never done it that way before but it would definitely be worth a try.
My mom and I did a lot of canning while I was growing up.
She would transfer the strained broth into a metal tea kettle and bring it back to a boil, then pour it into her sterilized jars. No ladle, no funnel, no mess ……easy peasey!
I still do it this way and I can’t imagine why everyone doesn’t.
This is a great tip! Thanks for sharing.
I canned my first batch of chicken bone broth but the recipe varies from the Ball recipe. I used a little vinegar and my own assortment of veggies. Processed it according to this post (and Ball instructions). Now I’m scared to use it because the recipe wasn’t exactly the same as the tested Ball recipe. How do you know it’s safe to consume? If botulism did grow, can I kill it with heat upon opening to make sure it’s safe to consume?
Adding vinegar wouldn’t affect the safety, and neither would the assortment of veggies (at least for a pressure canned stock recipe). If you followed the canning pressure and time suggested on their tested stock recipe there shouldn’t be an issue. Stock is quite flexible, and it doesn’t really matter what veggies/bones you use. The only cause to worry is if for some reason the jars didn’t seal, or you didn’t process them for the approved times/pressure.
Can I can beef stock in a water bath? I do beef for 3 hours but can I just do a broth ? For how long would I need to boil it?
All meat and meat products such as broth are not acidic and should always be pressure canned. Water bath canning is not considered safe for meat or for broth.
It is not considered safe simply because it has not be recently tested. However, people for generations, and some sections of society still today, exclusively waterbath with no harm to themselves and their families.
Hello, I am wondering why you cannot can bone broth in 1/2 gallon jars?
There are only two things tested and approved by the National Center for Food Preservation for canning in half-gallon jars. That is grape juice and apple juice, and both of those are high acid water bath can projects. There are no pressure canning instructions or timetables for anything in half-gallon jars, simply because it has never been tested.
Is it theoretically possible to safely can stock in half-gallon jars? Probably.
But the thing is, without a recipe that’s been really thoroughly tested for safety, there’s some risk of serious issues (botulism, etc).
We can a lot of stock, literally hundreds of jars a year, and I wish there were a half-gallon recipe. Sadly not, so I can in quarts.
To can in half-gallon jars, just increase your processing time of quarts for that item by 20%. I consistently and successfully can in half-gallon jars for my family of 9 as my big Presto can hold 4 half-gallons at a time. It’s too bad that people have gotten into the mindset regarding canning, to borrow a phrase from the totalitarian era of the Romans, “What is not expressly commanded (or, in our case, approved) is forbidden.”
BTW, I reuse my canning lids and some of them are on their 5th and 6th goes.
When the canning time is finished you only need to wait until the PRESSURE goes all the way down before opening. If you wait until the whole thing is at room temperature you will wait a very long time.
I often just leave it overnight, but yes, just leaving it until it’s down to zero is sufficient. Good point and thanks for mentioning it!
I have a glass top stove and my presto canner has a totally flat bottom so it can be used on this stove. Presto gives you tips on cleaning the stove top and bottom of the canner carefully, plus lets you know not to move (drag) it across the glass because it might scratch the surface. I couldn’t use my water bath canner on this stove because its indented on the bottom so it took for ever to heat and was even harder to regulate. Now I just usemy pressure canner for water bath when needed.
Can you use som instant pot for canning
No. The instant pot does not get to a dependable pressure and it’s not approved for canning. You can make the stock in the instant pot, but the actual canning needs to happen in a real pressure canner.
I live on the Gulf Coast of Alabama so I don’t live above much sea level elevation. So how do I know how long to pressurize at low elevation?
The times for pressure canning assume you’re at 0 to 1000 feet elevation. Use the regular time in the recipe, you only need to change it if you’re at higher elevations.
Hi, I just canned my first batch of pressure canned bone broth that I made. I’m new to canning, and did a lot of research on types of canners, how to can low acid foods, watched videos, and was very careful in the process. But I read a few scary articles on the risk of botulism that made me worry about everything !!! How to tell if they are sealed right, I was nervous after removing the rings I did find a little sticky residue around the rim, which freaked me out… now I’m scared to use them 😔 I’m such a hypochondriac lol… any advice would be soooo appreciated!!
So a couple of things…
They’re supposed to have sticky residue around them. When a liquid gets to pressure canner temps it’s really moving in there, and some of it splashes out. That’s normal. As they cool, the lid sucks down to seal.
Botulism requires a no oxygen environment to live, so if the jars didn’t seal then there’s oxygen and they’d just spoil normally (and smell horrible within a week or so). Check for seals, and wash off the outside of the jars (once they’re cool) so that they’re clean and the spilled stock doesn’t spoil on the outside. If the jars are sealed and you processed the correct pressure/amount of time then they were processed in a way that kills everything and prevents anything from getting in. Just make sure you do the right time/temp and that the jars sealed and you’re fine.
Some people choose to water bath can meat products and low acid foods (instead of pressure can) and that’s where things get squirrel-y. If you pressure canned them appropreately I wouldn’t worry about it.
“Some people choose to water bath can meat products and low acid foods (instead of pressure can) and that’s where things get squirrel-y.”
Please elaborate on this, I am new to all this and caned up some chicken broth last month and beef broth tonight and now I’m reading a water bath isn’t enough. Seals are extremely tight. I’m not looking to store it for a year. But is it even good after a month or week? Please help. Thank you
If you’re going to store bone broth at all, you need to use a pressure canner. Sealed lids do not equal safe food. If it’s not pressure sealed in can be stored in the refrigerator for a short time and then it would need to be frozen.
I did not skim off the fat from my bone broth when I pressured canned them. Is it safe to use? I did not realize that you were not supposed to. Should I throw it out?
I often forget to skim and I’ve never had an issue. The broth comes out clearer if you skim and filter it, but the main reason to skim is that as the jars process, extra oil can bubble up into the seal and prevent the jars from sealing. If the jars are all sealed (centers popped down) then they’re all fine to store and use. Even not skimming, I rarely have an unsealed jar, so it’s not really that big a deal and there’s no reason to throw out the stock you canned.
Two things I would recommend though, double check all the seals, and remove the canning rings/bands. Anything that did bubble out will gunk up the bands and make it hard to open the jars later on. If they’re properly sealed, the stock jars don’t need the bands once they’re completely cool. The lid should be vacuumed on there tight, and they’ll store cleaner without the rings.
I just loosen the rings rather than remove them. I have had mice get in and bite the edges of the lids off of the jars! Leaving the rings on loosely will prevent them from getting at the edges to do their dirty work and because the rings are loosened, they are not going to get stuck or cause any other issues.
Oh my goodness! That’s a problem that I’d never even thought of, I can’t believe those little beasties actually bit the jars. Now I’ve heard everything! That’s a really good reason to leave the rings on though.
Can you tell me when the stock gets to the gelling point?
Thanks
The best way to tell is to turn it off and allow it to cool completely, and then put it into the refrigerator to gel. It doesn’t have to get to the gelling point to can, and that’s not specifically required. It all depends on how much cartilage and connective material goes into the pot. A single pigs foot, or a few chicken wings or feet will make a stock gel easily, but if it’s all bone then it’ll have to be very concentrated to gel.
After canning chicken with the bone left in and using that chicken, can u use the bones again for broth?
Yes, you should be able to re-use the bones to make a second batch of broth. We cook the bones in our bone broth twice, the first time to make a very clean broth for use in soups. We filter that out and can it, and then we cook the bones a second time and make another batch with the same bones. The second batch is cloudy and much less refined, but it works great for rice or places where you don’t need perfect clear stock but still want some flavor and nutrition.
I would imagine making bone broth from the bones pulled from home canned chicken meat would be about the same as our second stock run.
Just found your site. Had a question about canning Bone Broth, and your site came up. So many people told me you cannot can it. Stands to reason you should be able to. Have been caning chicken stock for years. Doing my first canning of Bone Broth as I write this. Thank you so much for your terrific page. Will stop back again. So much helpful information.
Wonderful Janet, I’m glad it was helpful to you!
I have an instapot that has a canning feature for pressure cooking. I bought it when I realized I can’t use a regular pressure cooker on a glass top stove (next time I won’t by glass top). I can process meat in it but never have canned bone broth. I figure its worth a try. What do you think?
I have an instant pot, and to the best of my knowledge you cannot can in one (other than water bath canning without the pressure lid). The pressure doesn’t get to a dependable psi, and they won’t guarantee it for canning. I’ve never heard of one with a “canning” feature?
You CAN can in these if you are UNDER 2000 ft sea level… I have 2 power pressure cooker/canners and absolutely love them for canning! I also have a glass top and could no longer use my old traditional canners so the hubs bought me these as we have 2 huge gardens and I put up meat and veggies all the time! Only downfall is I can only use pints… but for just the two of us now (5 kids grown and gone), pints are perfect!! Just put up 6 pints green beans, 14 pints beef, 6 pints chicken and 1 of pork… unexpected canning day today as my freezer went out yesterday… ugh…
NO – Testing has been done and it has been PROVEN that these devices do not reach and maintain the required pressures to effectively kill the botulism pathogens. In their own user manuals the manufacturers say the “average” pressure at the “hi” setting is between 6.5 and 11 psi. If it does not attain and sustain a pressure of 10-11 PSI for the entire time then it has not killed the pathogens.
Around 2021 or early 2022, Instantpot released a new model that has the ability to reach 14 PSI, making it safe for canning anything. You just have to be sure and find the model suitable for pressure canning and not the older model only suitable for water bath canning.
I use my canner on my glasstop and I am canning at least once a week.
Thanks for your post. Have you ever had your broth or stock look great in the jar, smell fine upon opening, but then darken within a few hours? We’ve been pressure canning for years and just had this happen. Super sad. It’s like something oxidized when breaking the seal. Any advice is appreciated. Thanks much.
That’s interesting, I’ve never had that happen. If it is oxidization when you open the seal somehow, then adding more onion to the stock might help. Onions, especially onion peels, are rich in vitamin C. I save up the peels in the freezer and there’s always a bunch in my stock batches. Gives it good color, and I haven’t had any darkening issues (that I’ve noticed at least…)
Thank you so much, I’ll try that soon when I receive my pressure canner 😋 I was just wondering, does the bone broth still gelled after the canning process or more watery?
In our experience, it still gells. The instructions in our pressure canner tell you to cook the stock to the gelling point before canning it, so that it’s concentrated enough to gel. It doesn’t gel in the canning jar, but if you take it out and bring it to a boil on the stovetop, when it cools it will be normal thick gelled stock.
Thank you!!! I’ve been going absolutely crazy trying to find an answer to this. I’ve been pressure canning broth for years, but not all of it was ever meant to gel. If i’m breaking down chicken quarters, sometimes as cheap as 50 cents a lb, even in these hard times, i don’t expect to get gel. but i was wondering if my canning was breaking the gelatin. then i started to wonder, because when i pressure cook a gel broth, it gels just fine. Thanks for clarifying this pesky issue for me.
You’re very welcome. We’re so glad we could help.