Affiliate disclosure: This post may contain affiliate links. Please see our Privacy Policy.
There are a lot of great reasons to make a micro-batch mead. A super tiny batch is a great place to start if you’re just learning the process of mead making or if you’re an experienced brewer but you’re trying out something experimental.
Medicinal brews, using medicinal herbs, are also a great match for micro-batches because more often than not you’re taking smaller doses and don’t need a whole gallon, let alone 5 gallons.
I’m going to walk you through the basics of making a one-quart batch of plain mead. If you’re a beginner without a lot of equipment, give it a try.
For the rest of you interested in micro-batches, this is a good jumping-off point, and this recipe can be adapted based on your own creativity.
Want to add herbs? Or fruit? Or cider? Or just go crazy and toss in hot peppers and mustard seed? Go for it.
My goal here is to give you the basics of super tiny batches so that you have a foundation for your own experimentation.
Equipment for Micro Batch Mead
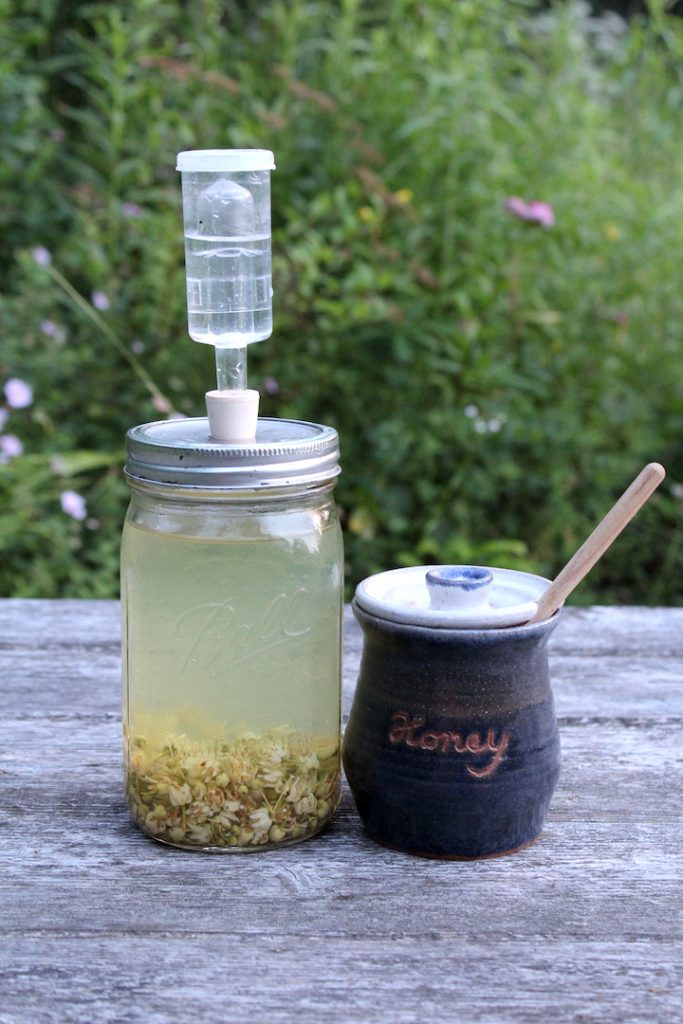
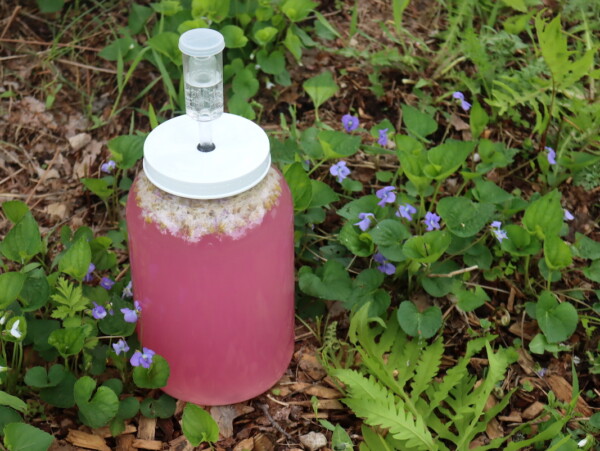
To get started, all you really need is a single-quart mason jar and a mason jar fermentation kit. Most mason jar fermentation kits are used with lacto-fermented veggies, but mead, wine, home brew and cider use the same principle.
The idea is to let gasses escape so that the container doesn’t explode as your little microbes put off CO2, but at the same time prevent air and spoiling bacteria to enter. They’re simply made one-way valves.
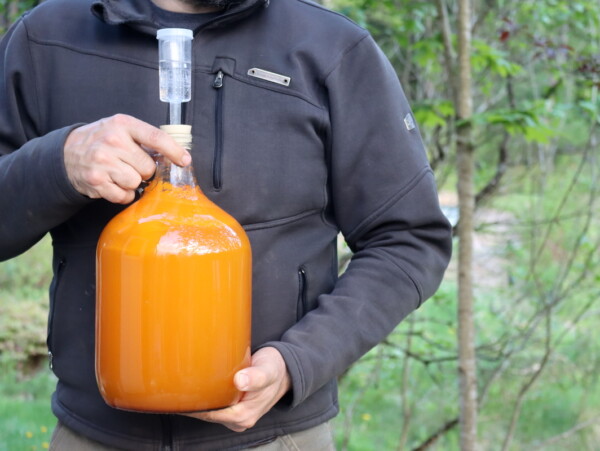
If you really want to go cheap, you don’t even need a home fermentation kit. I’ve seen tiny batches made in a discarded soda bottle with a balloon stretched over the top.
The balloon expands to allow the gasses space but seals it off to outside air. A simple plastic bag held on with a rubber band is also a common hacked-together alternative.
All manner of things can be used as an airlock, but really, if you’re planning on doing this more than once, invest in a fermentation kit. Honey is relatively expensive, so your ingredients are going to set you back more than the basic equipment.
There are a number of brands to choose from. I use one by Fermentools that looks a lot like a home brew setup, and if you choose to do bigger batches later you’ll need the rubber stopper and water lock that are included in the kit. I’m hoping at some point to try out these silicone fermentation lids from Mason Tops because they look super easy to clean.
Honey Ratios for Micro Batches
A one-gallon batch of mead generally uses 2 to 3 pounds of honey. Personally, I find 3 pounds of honey to a gallon to be way too sweet unless you’re adding in something tart to balance it.
Three pounds to a gallon works great for something like blackcurrant mead, where the fruit is quite tart and astringent. For something like raspberry mead, the result is a bit cloying. Adjust to your own tastes, but keep in mind that the 3 pounds to 1-gallon ratio will give you a dessert mead.
Three pounds to one gallon is, however, a convenient ratio for converting a recipe from a one-gallon batch to a one-quart batch. One pound of honey is 1 and 1/3 cups, so three pounds of honey would be 4 cups of honey.
A quart batch is 1/4 the size of a gallon batch, meaning that if you’re making a sweet mead, you’d start with 1 cup of honey for your quart batch of mead.
For a drier mead, the recommendation is 2 pounds to a gallon instead of 3 pounds. For a quart batch, that means you’d want 2/3 of a cup for a drier mead. Anywhere between 2/3 of a cup and 1 full cup will work just fine.
Choosing Yeast for Micro Batches
Yeast is a bit trickier. Sure, you could toss in a pinch of bread yeast, and it will in fact make alcohol, but it won’t taste particularly good.
Different yeasts impart different character to your batches. A good place to start is with a champagne yeast because it will allow your brew to reach a respectable alcohol percentage without being too picky. It also doesn’t put out any off-flavors.
Dry brewing yeast packets are packed for 5-gallon batches, so they’re already overkill if you’re making a 1-gallon batch, and they’re downright preposterous in a 1-quart batch. I start with a small packet, and eyeball measure about a quarter of it to rehydrate in 1/4 cup of water. The rest, I save inside the packet in a ziploc bag in the fridge until I’m ready to make my next batch.
It’s important to rehydrate dry yeast before exposing it to a high sugar environment so that the yeast cells don’t go crazy too fast. Putting them into the honey water before they’re rehydrated can potentially kill or stunt them. Be sure to rehydrate the yeast in a small amount of water, for a quart I use about a 1/4 cup.
Liquid yeasts are also an option, and White Labs makes glass vials of a variety of specialized yeast strains. If you’re going to make hard cider, or a cizer (mead/cider mix) then give their liquid cider yeast a try. Again, I’d just use a part of the vial in a quart-sized batch.
How to Make a Quart Batch of Mead
With your super basic equipment and ingredients in hand, you’re ready to get started!
I make my batches as lazy as possible, producing as few dishes as possible. It makes it easy to brew in a tiny kitchen and helps prevent you from getting overwhelmed by equipment, mess and dishes that are a problem in larger-scale home brew.
Start by adding 2/3 to 1 cup of honey directly into the bottom of a quart mason jar. Bring some clean, chlorine-free water to a boil in a tea kettle. Let it cool a little, and then pour hot, nearly boiling water into the jar until it’s about 3/4 of the way full. Stir until the honey is completely dissolved.
Allow the honey and water mixture to cool to around body temperature, somewhere between 90 and 100 degrees. Pitch in your already dissolved yeast, and then top with more water until you’re about 1 inch from the top of the jar. Add on your mason jar fermentation kit and let your brew ferment at room temperature out of direct sunlight for 4-6 weeks.
Primary and Secondary Fermentation
Often homebrewers talk about “primary” and “secondary” fermentation, and as you’re watching your mead bubble away in the jar you’ll be able to see the difference. During primary fermentation, the bubbling is very vigorous as the yeast are feasting on large amounts of sugar. It’ll take a day or two to get going, but after that, for the first 1-2 weeks, there should be very active primary fermentation.
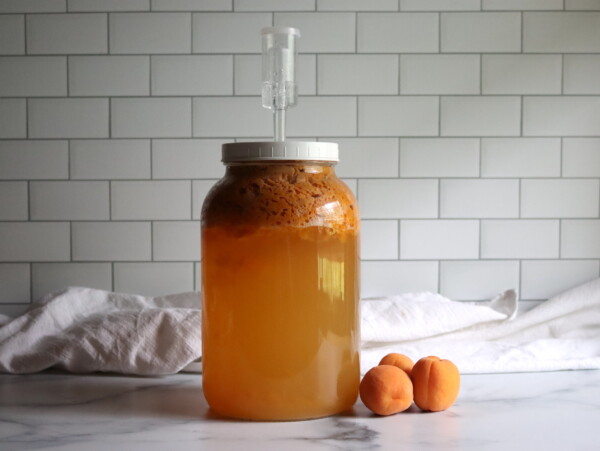
After the primary ferment, when the yeast settles down a bit, most brewers will pour off the brew into a clean container, leaving the sediment behind. This results in a clearer final brew and can improve quality.
It’s optional but highly recommended in a few cases. If you’re using fruit chunks or whole spices, I’d suggest you “rack” the mead over into a clean container after primary and filter out any solid spices or fruit through a fine-mesh strainer.
Big fruit chunks floating above the water level in the container can mold over time, and spices like cinnamon can add harsh flavors if left in too long.
If you choose to move or “rack” the mead into a secondary container, just choose another clean quart mason jar and after you’ve carefully poured the mead over, leaving sediment behind and filtering out solids, attach the water lock to the top of the new jar and allow it to finish fermenting until it’s time to bottle.
Bottling Small Batch Mead
To bottle, for larger batches you siphon the brew over to another container, leaving the dregs at the bottom so they don’t give any off-flavors to your brew. In a quart jar, I’ve been very successful just very carefully and slowly pouring the mead off into a separate jar before bottling, leaving the sediment behind. This saves both the cost of a siphon setup, along with the mess.
To bottle, you can either just cap it up in the clean mason jar you racked the mead into. Better yet, I’ve been using these grolsch bottles. The cap is integrated into the bottle, which saves you on buying a bottle capper and it’s much easier than corks.
Depending on the type of mead, it may taste pretty decent at this point, or horrible. Some of the best meads taste a bit raw at this point, but they just need time.
If it tastes like vinegar, then something went wrong, likely with your airlock. Use it as a honey vinegar on salads and try again.
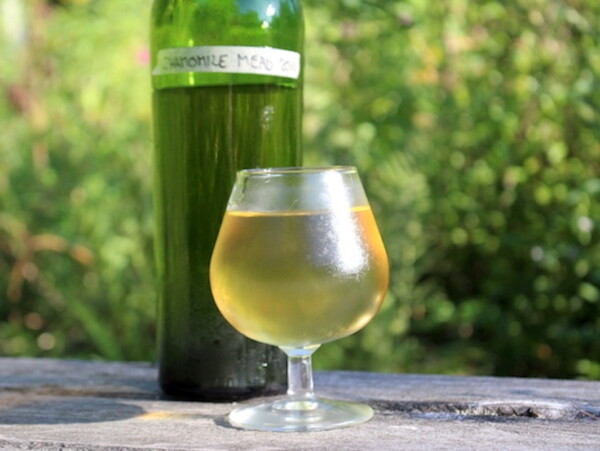
Just about every type of mead tastes better after some time in the bottle. At least 2 weeks, but preferably much longer. Fruit meads mature faster, more delicate floral meads or any type of spiced mead needs more time.
The nice thing about bottling in a Grolsch bottle or right in a mason jar is that you can take a nip, test it, and then cap it back up. That’s not an option with a cork.
Notes on Making Better Mead
A few notes…this will in fact make a mead. All you really need is honey, water and yeast. With that in mind, honey is a complex food that’s much harder to digest than beer malt or grape juice.
Most mead makers help the yeast out a bit by adding a bit of other nutrients to give them a boost. A good cheap way to do that is to add a few raisins to a batch. Two to three is plenty for a quart batch.
For flavor, adding in a bit of tannin and acid is also a good idea. A slice of lemon or orange, skin and all, adds in a little acid and bitterness from the pith in the peel, along with some delightful citrus notes.
Some brewers put a black tea bag in with their brew for tannin, but that’s overkill for a micro-batch. If you’d like to try it, make a very weak cup of tea, steep black tea in 1 cup of water for 30 seconds to a minute, and try adding that in as part of your water.
Experimenting with Micro Batch Meads
If you’re making an experimental batch, try adding in 1/4 to 1/2 cup of fruit, a few tablespoons of herbs or switch out your water for cider, juice or tea. I’ve enjoyed all manner of mead, from hot pepper to tomato, and they’re all pretty darn good.
Be careful using anything that’s going to dramatically change the chemistry of the brew. Lots of lemon or lime juice, for example, will add a lot of acid that can be harsh on the yeast (and your palate).
Overall, have fun, and the sky’s the limit! You’re making a small batch to learn and to try new flavors, so there’s little risk in time, equipment, mess or ingredients with this method.
What micro brew meads are you excited to try first? Leave a note in the comments.

So, I ordered champagne yeast packets – each one contains 5 grams of yeast and is supposed to make five gallons.
I have a bunch of odds and ends bottles of honey to use up so I’m gonna do a bunch of quart batches (8 of them) with the silicone fermentation caps, but my question relates to how much yeast to use…
I have a jewelry scale that can accurately measure individual grams, but I don’t know how finicky mead is – do I need to use precisely .25 grams of rehydrated yeast per quart, or can I overshoot a bit without trouble? If I can split the packet in half to 2.5g and then split that into 8, it would be a bit more than .25… around .31… I just don’t know if I need to be concerned with being that exact with the yeast.
Any helpful suggestions/advice?
It really doesn’t have to be exact at all, no need to measure. Literally, just a pinch for each is plenty, since it’s such a small container. When I start multiple batches at once, I just dissolve the whole yeast packet in a measuring cup with a bit of water. Let the yeast bloom a while, then stir it to distribute, and then divide the yeast water across all the batches. If you’re not making them at the same time, just take a pinch for each.
whole packet of yeast is roughly for how many quart jars?
In theory, it’s enough for 20 jars, but it’d be hard to be that even an exact. I’d say getting about 10 jars to a packet would be a good goal. Keep the yeast sealed up in the refrigerator between uses so it says healthy.
Wow this is really micro. How many bottles do you get out of a 1 quart jar?
Just one =)
Loved the article! Questions: I can’t be home longer than 5 days at a time. Will the meade spoil if it sits past the end of initial fermentation? I’m usually away for 4-5 weeks. I’m a big fan of cinnamon. Would cinnamon interfere with fermentation? I would love to try this if it can survive a month without monitoring.
I would start it, and then rack it into secondary after 5 days right before you leave. When you rack it, take out the cinnamon. That can get a bit intense left in there too long. Boil a cinnamon stick in with the water, and then pour the water and stick into the primary. At the end of 5 days, even if it’s still bubbling hard, siphon it over, taking the cinnamon out and leave it in secondary while you’re gone. Should be totally fine. Good luck!
Okay, I’m a little confused. I don’t see “primary” and “secondary” in the article anywhere. All I see is fermentation and bottling. Are you saying I should only ferment for five days instead of the 4-6 weeks advised in the article and then bottle? I recognize that adding fruit without being able to monitor would be a problem, but reducing fermentation from five weeks to five days seems extreme enough that I would like to clarify. Is it the addition of the cinnamon that requires the shortened fermentation? Would the full fermentation be better if I omitted the cinnamon? Could cinnamon or even fruit be added if weighted down with cheesecloth ?
Thanks again. This sounds like a wonderful project and looks doable with just a little planning.
Oops…sorry, I wrote this one quite a while ago and only went into the really basic procedure. I’ve added more detail and a section about primary and secondary ferments. Moving the batch into a secondary is optional, but if you’re using cinnamon I’d recommend that step. If you’re making a plain mead with nothing added, no worries at all just make it, watch it for the 5 days you’re home to make sure it doesn’t go crazy and overflow, but after 5 days the fermentation really slows and it’s fine to be left untended until you get back. With cinnamon, if you don’t want to do the secondary, you can just simmer the cinnamon in a little water for a few minutes and then pull it out so it never goes into the jar at all. Then you can skip the secondary if you want.
Here are the details I added to the post above, let me know if you have any other questions!
“Often homebrewers talk about “primary” and “secondary” fermentation, and as you’re watching your mead bubble away in the jar you’ll be able to see the difference. During primary fermentation, the bubbling is very vigorous as the yeast are feasting on large amounts of sugar. It’ll take a day or two to get going, but after that, for the first 5-15 days, there should be very active primary fermentation.
After the primary ferment, when the yeast settles down a bit, most brewers will pour off the brew into a clean container, leaving the sediment behind. This results in a clearer final brew and can improve quality. It’s optional but highly recommended in a few cases. If you’re using fruit chunks or whole spices, I’d suggest you “rack” the mead over into a clean container after primary and filter out any solid spices or fruit through a fine mesh strainer.
Big fruit chunks floating above the water level in the container can mold over time, and spices like cinnamon can add harsh flavors if left in too long.
If you choose to move or “rack” the mead into a secondary container, just choose another clean quart mason jar and after you’ve carefully poured the mead over, leaving sediment behind and filtering out solids, attach the water lock to the top of the new jar and allow it to finish fermenting until it’s time to bottle. “
So, I gave this a try with 3 different flavors: Blueberry, Peach, and Blueberry w/ Lemon. I brew them on 2/15 and as of today the Peach and Blueberry/Lemon have already stopped bubbling. The Blueberry is still going but very slowly.
You said above that they should be left alone for at least 2 wks. Should I stick with it or do you think something might have gone wrong since they are no longer bubbling?
Sometimes they go a little quicker with the primary, based on the nutrients in the fruit and the temperature they’re stored. That’s normal. Go ahead and rack them into secondary, leaving the sediment behind and filtering out any fruit. Leave them in secondary for 4-6 weeks, even if you cant see bubbles this time. Good luck!
Just out of curiosity, what’s even the point of waiting 2 months for just a measly litre of wine?
Good point…and years ago I would have asked the same question. I felt the same about small batch canning, it just seemed pointless to can 2 jars of jam. Why not make 20? But now I’ve made dozens of 5-gallon batches and I have more than 200 bottles in my basement…I want to brew more than I want to drink. Similarly, I want to try out new jams more than I want to eat 20 jars of the same batch of jam. There are more reasons, and I answered this question in detail in this post, 10 reasons to make micro batch wine.
Hi, when it comes to cleaning any fermentation equipment have you ever tried or heard of using hydrogen peroxide, baking soda, and water solution. afterwards bake it in the oven ?
Thank you
Honestly, nope I can’t say that I have, but it sounds like it might work reasonably well off hand. Provided that is, that it can handle the oven temperatures. You might be better either boiling it or running in a “sanitize” cycle on the dishwasher. Still not a good idea for any plastic though, and I’m not sure how heat safe traditional glass carboys are.
Getting bees in the spring. I am looking forward to trying your microbrew method. Thank you.
I have the Easy Fermenter Wide Mouth Lid Kit and I have made fermented carrots and radishes. It is now December of 2018 and I read in the comments that you got some silicone air locks in August of 2018. Have you had a chance to make any mead with them? And if so, how did it turn out?
I am wanted to try my hand at this. Thanks for the article.
They work great! Since you don’t have a waterlock that bubbles, it can be tricky to tell when it’s done fermenting. Carefully watch for bubbles within the actual jar, or put a piece of tape over the valve when you think it’s done and see if the silicone pooches out. The whole top will get domed if the valve gets clogged. It can also be a bit tricky if you’re brewing with solids, like fruit. They can sometimes float up out of the water and push into the lid, causing it to dome out. The fruit will mold if you leave it out like that, so if you see the lid dome-ing at all take it off and scoop out the solids.
Could you use the glass weighs (hockey pucks) to hold down the fruit. I would set the quart jar inside another bowl incase it over flows.
I’ve tried, and when there’s just a small bit of fruit the glass weight just pushes past the fruit and sinks to the bottom. For a glass weight to work you really need a jar that’s pretty full of solids (like sauerkraut).
Thank you for the article on how to make mead
Thanks for the article: don’t have any raisins, so a few craisins are going to help out my yeastie beasties.
Hi Ashley,
I’ve got some of those silicone airlocks, and I was wondering, since they don’t bubble, how can you tell when it’s ready when using those… Any ideas? Thanks!
I just got some of those silicone airlocks this week (finally), and I haven’t brewed with them yet. I was thinking that same thing, and I’ve been trying to work out a good method. My first thought is to put a tiny piece of tape over the air outlet, and watch and see if the airlock puffs up after about an hour. I’ll have to play with it though, and I’ll let you know after I’ve made a few batches with them.
Could also tape a balloon over it and see when it stops inflating? Let me know if you figure it out! 🙂
Did you ever devise on a way to know if it’s done fermenting? I just transferred to secondary today and am using the silicone airlock. .
When it builds up pressure in the silicone airlock it actually domes a bit before the airlock “burps” out the CO2. You can usually see that if you look closely. The second thing you can do is pinch the airlock nipple, and if there’s pressure in there it’ll cause the top to drop slightly as it’s released. I’d release it and then wait 3-5 days, check it again to see if it’s built up any pressure in there.
Great instructions! Can you make only a quart in a gallon airlock jar?
Can you theoretically do it? Sure. Personally, I’d size the brew to the size of the jar because with that much empty headspace there’s more chance for contamination.
Awesome tips! what do you use or do to sterilize the jars before making the mead?
I don’t, largely out of laziness honestly. Occasionally I’ll have a batch go off, but for the most part, the yeast packet takes over so fast that there’s not the time for other things to colonize. That said, most people use a no rinse sanitizer on all their home brewing equipment. If you want a consistent batch, it’s a good idea to sanitize everything first. If I do have a batch go off, I’ll sterilize everything before I use it again. Here’s the one step, no rinse home brew sanitizer I use: https://amzn.to/2BBN4fN
Is this meant to drink right away when fermentation is finished, or to age in the bottle before enjoying? Trying a test batch with 1 cup of black tea and a strip of lemon peel, and four home-dehydrated raisins.
Good question. I just updated the article because I didn’t mention anything about aging. It’ll be best with at least a few weeks to age in the bottle. Fruit meads mature faster, and anything with spices or flowers needs more time to mature, around a few months.
Be careful where you put it because the yeast are still alive and going. In the summertime with hot temperatures, make sure you put your mead somewhere cool to age in the bottle.
Your plain tea mead sounds great. A friend of mine makes a sweet tea mead that’s heavy on the honey so that it comes out quite sweet and it’s amazing in the summertime. Good luck!
Did you just drill hole in jar lid for air lock? I want to try making mead as I just found out about mead at a wine tasting. Like stated before, I want to start small till I get to making good mead with out a big investment. Thanks.
The lid I used comes from a kit. You need a rubber gromet of some kind to seal the hole and to keep the airlock in place.
If you really want to try making mead without spending any money on supplies, you can brew the batch in a small soda bottle using a balloon as an airlock. The balloon will inflate as the CO2 escapes, and you’ll need to pop it off to deflate it periodically. I have friends who use this method and do all quick meads with very short fermentation times. Gets the job done, but the flavor isn’t quite as full as a more mature mead.
I picked up a fermenting kit after the holidays. Imagine how excited I am to read through your post, and know that I can try a small batch mead! And I have elderberries waiting for me in the freezer!
Thanks so much for this and all the ideas. Its just me so micro brewing is perfect. Can’t wait to get started.
How can you tell if it’s done, or if something’s gone wrong and it’s gone bad?
It’s done when the fermentation stops. Watch the water lock at the top for about 5 minutes. If there are no bubbles, then it’s done fermenting. As to telling if it’s bad, there are a number of ways. If there’s a fruit of some kind that was not submerged, it may be moldy at the top. Look for mold or discoloration. If the airlock wasn’t completely sealed it might have turned to vinegar, and you should be able to taste that.
To my knowledge, there’s nothing that can go wrong with a ferment that would make it in any way toxic. If there’s any mold, you can either scrap the batch or carefully remove the mold from the top and bottle. If it’s vinegar, just use it as vinegar.
Hi. Does everything need to be super sanitized before making the mead? Like with campden tablets, boiling, etc? Thx!
We typically recommend a one step brewing sanitizer to sanitize equipment.
Thank you so much for this article. I am wanted to begin making my own mead, but was nervous about having to make such a large amount. I was afraid I would have put so much into it, only to have it turn out horrible. This is a great starting amount for a beginner like me. I am not really a big drinker, but am a sucker for trying pretty much anything just to prove I can do it. But, this size batch just may change my mind… 😉 … Thank you again… Can’t wait to hear if you have more recipes to come.
Going to give it a try. Thanks for the info.
Do you have a recipe for the sweet tea mead? My wife has Celiacs so we’ve always been somewhat interested in mead to drink. Plus, she’s from the south so loves super sweat tea.
Here is a lemon balm mead recipe that also uses black tea.