Affiliate disclosure: This post may contain affiliate links. Please see our Privacy Policy.
There are a lot of great reasons to make a micro-batch mead. A super tiny batch is a great place to start if you’re just learning the process of mead making or if you’re an experienced brewer but you’re trying out something experimental.
Medicinal brews, using medicinal herbs, are also a great match for micro-batches because more often than not you’re taking smaller doses and don’t need a whole gallon, let alone 5 gallons.
I’m going to walk you through the basics of making a one-quart batch of plain mead. If you’re a beginner without a lot of equipment, give it a try.
For the rest of you interested in micro-batches, this is a good jumping-off point, and this recipe can be adapted based on your own creativity.
Want to add herbs? Or fruit? Or cider? Or just go crazy and toss in hot peppers and mustard seed? Go for it.
My goal here is to give you the basics of super tiny batches so that you have a foundation for your own experimentation.
Equipment for Micro Batch Mead
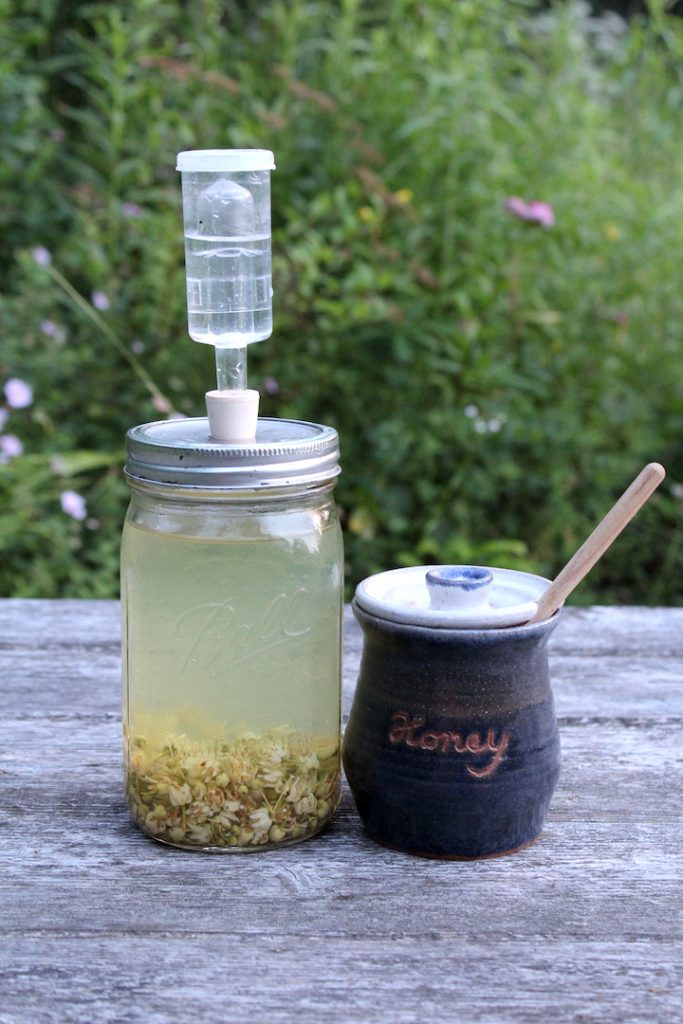
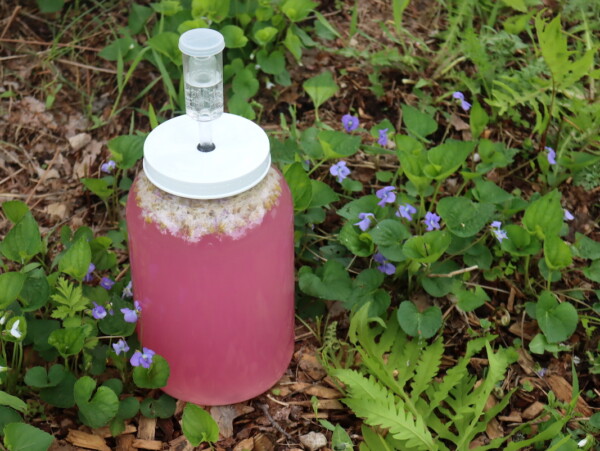
To get started, all you really need is a single-quart mason jar and a mason jar fermentation kit. Most mason jar fermentation kits are used with lacto-fermented veggies, but mead, wine, home brew and cider use the same principle.
The idea is to let gasses escape so that the container doesn’t explode as your little microbes put off CO2, but at the same time prevent air and spoiling bacteria to enter. They’re simply made one-way valves.
If you really want to go cheap, you don’t even need a home fermentation kit. I’ve seen tiny batches made in a discarded soda bottle with a balloon stretched over the top.
The balloon expands to allow the gasses space but seals it off to outside air. A simple plastic bag held on with a rubber band is also a common hacked-together alternative.
All manner of things can be used as an airlock, but really, if you’re planning on doing this more than once, invest in a fermentation kit. Honey is relatively expensive, so your ingredients are going to set you back more than the basic equipment.
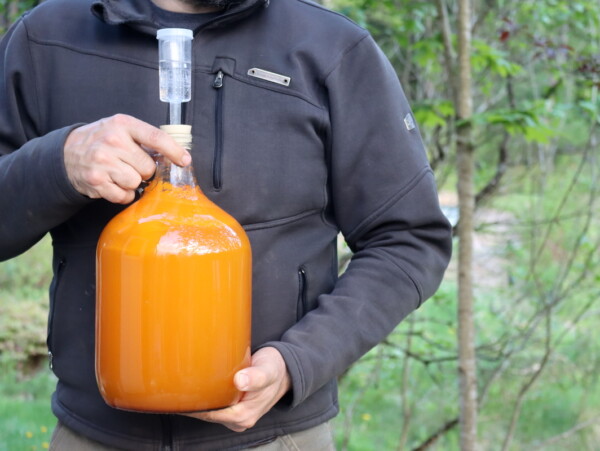
There are a number of brands to choose from. I use one by Fermentools that looks a lot like a home brew setup, and if you choose to do bigger batches later you’ll need the rubber stopper and water lock that are included in the kit. I’m hoping at some point to try out these silicone fermentation lids from Mason Tops because they look super easy to clean.
Honey Ratios for Micro Batches
A one-gallon batch of mead generally uses 2 to 3 pounds of honey. Personally, I find 3 pounds of honey to a gallon to be way too sweet unless you’re adding in something tart to balance it.
Three pounds to a gallon works great for something like blackcurrant mead, where the fruit is quite tart and astringent. For something like raspberry mead, the result is a bit cloying. Adjust to your own tastes, but keep in mind that the 3 pounds to 1-gallon ratio will give you a dessert mead.
Three pounds to one gallon is, however, a convenient ratio for converting a recipe from a one-gallon batch to a one-quart batch. One pound of honey is 1 and 1/3 cups, so three pounds of honey would be 4 cups of honey.
A quart batch is 1/4 the size of a gallon batch, meaning that if you’re making a sweet mead, you’d start with 1 cup of honey for your quart batch of mead.
For a drier mead, the recommendation is 2 pounds to a gallon instead of 3 pounds. For a quart batch, that means you’d want 2/3 of a cup for a drier mead. Anywhere between 2/3 of a cup and 1 full cup will work just fine.
Choosing Yeast for Micro Batches
Yeast is a bit trickier. Sure, you could toss in a pinch of bread yeast, and it will in fact make alcohol, but it won’t taste particularly good.
Different yeasts impart different character to your batches. A good place to start is with a champagne yeast because it will allow your brew to reach a respectable alcohol percentage without being too picky. It also doesn’t put out any off-flavors.
Dry brewing yeast packets are packed for 5-gallon batches, so they’re already overkill if you’re making a 1-gallon batch, and they’re downright preposterous in a 1-quart batch. I start with a small packet, and eyeball measure about a quarter of it to rehydrate in 1/4 cup of water. The rest, I save inside the packet in a ziploc bag in the fridge until I’m ready to make my next batch.
It’s important to rehydrate dry yeast before exposing it to a high sugar environment so that the yeast cells don’t go crazy too fast. Putting them into the honey water before they’re rehydrated can potentially kill or stunt them. Be sure to rehydrate the yeast in a small amount of water, for a quart I use about a 1/4 cup.
Liquid yeasts are also an option, and White Labs makes glass vials of a variety of specialized yeast strains. If you’re going to make hard cider, or a cizer (mead/cider mix) then give their liquid cider yeast a try. Again, I’d just use a part of the vial in a quart-sized batch.
How to Make a Quart Batch of Mead
With your super basic equipment and ingredients in hand, you’re ready to get started!
I make my batches as lazy as possible, producing as few dishes as possible. It makes it easy to brew in a tiny kitchen and helps prevent you from getting overwhelmed by equipment, mess and dishes that are a problem in larger-scale home brew.
Start by adding 2/3 to 1 cup of honey directly into the bottom of a quart mason jar. Bring some clean, chlorine-free water to a boil in a tea kettle. Let it cool a little, and then pour hot, nearly boiling water into the jar until it’s about 3/4 of the way full. Stir until the honey is completely dissolved.
Allow the honey and water mixture to cool to around body temperature, somewhere between 90 and 100 degrees. Pitch in your already dissolved yeast, and then top with more water until you’re about 1 inch from the top of the jar. Add on your mason jar fermentation kit and let your brew ferment at room temperature out of direct sunlight for 4-6 weeks.
Primary and Secondary Fermentation
Often homebrewers talk about “primary” and “secondary” fermentation, and as you’re watching your mead bubble away in the jar you’ll be able to see the difference. During primary fermentation, the bubbling is very vigorous as the yeast are feasting on large amounts of sugar. It’ll take a day or two to get going, but after that, for the first 1-2 weeks, there should be very active primary fermentation.
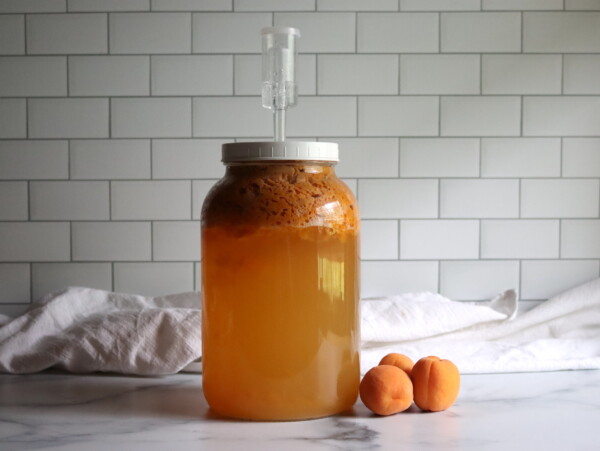
After the primary ferment, when the yeast settles down a bit, most brewers will pour off the brew into a clean container, leaving the sediment behind. This results in a clearer final brew and can improve quality.
It’s optional but highly recommended in a few cases. If you’re using fruit chunks or whole spices, I’d suggest you “rack” the mead over into a clean container after primary and filter out any solid spices or fruit through a fine-mesh strainer.
Big fruit chunks floating above the water level in the container can mold over time, and spices like cinnamon can add harsh flavors if left in too long.
If you choose to move or “rack” the mead into a secondary container, just choose another clean quart mason jar and after you’ve carefully poured the mead over, leaving sediment behind and filtering out solids, attach the water lock to the top of the new jar and allow it to finish fermenting until it’s time to bottle.
Bottling Small Batch Mead
To bottle, for larger batches you siphon the brew over to another container, leaving the dregs at the bottom so they don’t give any off-flavors to your brew. In a quart jar, I’ve been very successful just very carefully and slowly pouring the mead off into a separate jar before bottling, leaving the sediment behind. This saves both the cost of a siphon setup, along with the mess.
To bottle, you can either just cap it up in the clean mason jar you racked the mead into. Better yet, I’ve been using these grolsch bottles. The cap is integrated into the bottle, which saves you on buying a bottle capper and it’s much easier than corks.
Depending on the type of mead, it may taste pretty decent at this point, or horrible. Some of the best meads taste a bit raw at this point, but they just need time.
If it tastes like vinegar, then something went wrong, likely with your airlock. Use it as a honey vinegar on salads and try again.
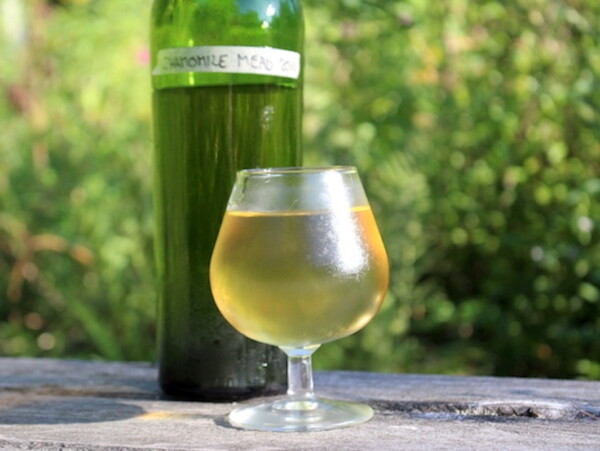
Just about every type of mead tastes better after some time in the bottle. At least 2 weeks, but preferably much longer. Fruit meads mature faster, more delicate floral meads or any type of spiced mead needs more time.
The nice thing about bottling in a Grolsch bottle or right in a mason jar is that you can take a nip, test it, and then cap it back up. That’s not an option with a cork.
Notes on Making Better Mead
A few notes…this will in fact make a mead. All you really need is honey, water and yeast. With that in mind, honey is a complex food that’s much harder to digest than beer malt or grape juice.
Most mead makers help the yeast out a bit by adding a bit of other nutrients to give them a boost. A good cheap way to do that is to add a few raisins to a batch. Two to three is plenty for a quart batch.
For flavor, adding in a bit of tannin and acid is also a good idea. A slice of lemon or orange, skin and all, adds in a little acid and bitterness from the pith in the peel, along with some delightful citrus notes.
Some brewers put a black tea bag in with their brew for tannin, but that’s overkill for a micro-batch. If you’d like to try it, make a very weak cup of tea, steep black tea in 1 cup of water for 30 seconds to a minute, and try adding that in as part of your water.
Experimenting with Micro Batch Meads
If you’re making an experimental batch, try adding in 1/4 to 1/2 cup of fruit, a few tablespoons of herbs or switch out your water for cider, juice or tea. I’ve enjoyed all manner of mead, from hot pepper to tomato, and they’re all pretty darn good.
Be careful using anything that’s going to dramatically change the chemistry of the brew. Lots of lemon or lime juice, for example, will add a lot of acid that can be harsh on the yeast (and your palate).
Overall, have fun, and the sky’s the limit! You’re making a small batch to learn and to try new flavors, so there’s little risk in time, equipment, mess or ingredients with this method.
What micro brew meads are you excited to try first? Leave a note in the comments.


Can’t one just use wine bottles for the whole process?
I suppose you could if you really wanted to but we find the quart-size jars to be easier to work with when measuring, adding ingredients and stirring.
Does your bottle mead need to be refrigerated?
No, it does not need to be refrigerated. You do want to store it in a cool, dark place.
Mine turn to the in-between mead and vinegar. Not awful but not enjoyable to drink 🙁 It stayed in a dark cool place the whole time… I think I left it there a bit too long.. any thoughts?
Yes, it definitely sounds like you left it too long if it was turning to vinegar. I would just check it sooner.
I am cheap, but I don’t use balloons, I use plastic gloves and rubber bands – it looks funny when all five fingers are filled with gas…and you just loosen the rubber band and let the gas out. When they don’t inflate anymore, you know it’s time to rack…
Plastic gloves and rubber bands would certainly work as well.
Do you think vaccuum sealing the second fermentation would hinder or help?
It really needs to be able to off-gas, so vacuum sealing wouldn’t help.
Hi, I just racked my mead for the first time because I added strawberries to the first batch and lemons to the second. It doesn’t seem to be fermenting. Is that ok?
Sometimes in secondary it can be hard to see since it’s going so much slower than primary. Look closely and see if it’s going slowly, but if it is “stuck” and just not fermenting, try this troubleshooting guide: https://blog.homebrewing.org/restarting-stuck-mead-fermentation/
This is awesome. Do you normally have them flat or carbonated? If I were to look to get it carbonated, how much sugar would you recommend for such a small batch?
With this recipe, is it carbonated or still when finished?
It can be either. Here’s a recipe for sparkling mead, if that’s what you’re interested in doing: http://www.stormthecastle.com/mead/how-to-make-a-sparkling-mead.htm#:~:text=Sparkling%20Mead%20%2D%20or%20champagne%20mead,consistency%20of%20a%20regular%20champagne.
This is an amazing article, I really want to try this. I would like to make a cranberry orange mead or one with tea (not sure of the flavor yet) would I use fruit juices for the cranberry orange and boil that instead of water? or actual fruit? what kind of tea favors would you recommend? can it be tea bags, or does it have to be loose leaf tea? Tea and honey seem like a natural and delicious match, so I’m looking forward to it. Also, when it’s fermenting, it should be in a cool/dark place, right? after it’s bottled, do you store it in the fridge for the 2-weeks before and after you taste it? Dumb question, is Mead usually consumed cold? (I’ve never had it before).
So orange juice can get bitter during fermentation, and I wouldn’t use too much. I’d suggest adding just a tiny bit of fresh juice, and then a good bit of fresh zest off an organic orange (just the orange-colored part, not the white pith if you can). Cranberry juice you can use, just choose a 100% juice (rather than that corn syrup cocktail stuff).
If I were going to do it, I’d add in 1 cup honey to the bottom of the jar, then fill with cranberry juice instead of water, and add in the other ingredients as specified (yeast, etc). Let if ferment in primary, then when you move it into secondary add in orange zest and top off the container with fresh orange juice, filtered well as the pulp from oranges can cause off-flavors. In secondary, the zest will infuse and won’t be driven off or caused to volatilize with the rapid fermentation that happens in primary.
For the tea one, yup you can just use tea instead of water. Some teas can be weird and have unintended flavors, as things like cinnamon get intense in a mead. I did an earl grey mead that was wonderful though.
Mead can be consumed at room temp or cold, either way. I live it cold though.
Sooooooo glad I found this; I didn’t want to make a 5-gallon batch just to screw it up!
Question about racking: can I pour my “raw” fermentation through several layers of cheesecloth? Would that be okay?
Unfortunately, cheesecloth is not recommended as it can increase the probability of oxidation and infection. Siphoning out the clear mead from your chunks of fruit, herbs, and residual yeast is the safest way to go about racking your mead.
Hello! Thank you for this! I got to try many people’s small batch mead at a gathering once and have wanted to try ever since. Hope you’re still answer comments. Questions here after reading comments (hopefully it’s not a repeat question). I’m trying to do this on as low a budget as possible and so appreciate all your tested hacks.
– I want to use wild yucca flowers and desert sage from the land where I’ll be living this summer — thoughts on whether/how this may affect the primary?
– Could I use something else as a starter culture that’s cheaper/free (other than optimal champagne yeast)?
– Will I need to burp the balloon in the primary? I don’t want to have to buy mason jars and airlocks.
– Think I’d be alright using a clean/sterilized upcycled kombucha or lemon juice bottles to for both the primary and secondary (separate containers, sanitized)? I’ve been saving these beautiful ones for this purpose. I saw you mentioned someone using a soda bottle so I figure the answer is yes 🙂
THANK YOU!!!
I honestly don’t know about how yucca flowers or sage would affect the primary. I’d guess the sage might inhibit the yeast since it has strong antimicrobial properties, but I do not really know for sure. Strong flavors, like sage, cinnamon, cloves, etc tend to get bitter and not taste the best in ferments so I’d personally avoid that but it’s up to your personal taste.
You can definitely use wild yeast, though the results will be a bit less predictable, but I’ve done it plenty of times. There’s a really good article on capturing wild yeast here: https://www.chelseagreen.com/2018/in-search-of-wild-yeast/
Yes, you’ll likely have to burp the balloon, possibly several times a day in the first few days of active fermentation (though it’s been a long time since I’ve use the balloon method, so I don’t remember exactly). If you take a needle and put a pinhole in the balloon top then it will create a slow leak that de-pressurizes the balloon on its own which is a much more dependable method.
Yup, you can definitely use just about any clean container you have.
Enjoy, I hope it turns out wonderfully!
I used your recipe as a guide and tried making mead for the first time – just a 1-quart batch. However, it seems to take WAY longer than your recipe says. I started it back in October or November, and it’s still bubbling! I did use champagne yeast, which is very strong – just about the tiniest pinch I could manage. I would estimate it was about 1/16 of a teaspoon.
The good news is, I have tasted it a few times throughout the process whenever racking it to a new jar, and it seems to be getting more and more delicious! The first couple of months it tasted horrible – like pure yeast and kind of bitter. Now it is sweet and rich like honey and tastes SO strong! I wonder what the alcohol content may be, but don’t have one of those tester thingys..
My main concern now is that I don’t want to bottle it while it’s still bubbling. How much longer will it go on?? Is it okay to bottle even though it’s still going? I would like to bottle it but I don’t plan to drink it until probably the fall if I can help it, as I like mead as a fall/winter drink, and have heard that it just gets better with age.
Interesting…that’s a long ferment, and a long time to still see it actively bubbling. If you made a micro-batch and you want to bottle it now, I’d say do it, but keep it in the refrigerator until you plan on drinking it in the fall. Slow, cold bottle aging results in the best flavor anyway.
Thanks for the great info! I’m a beekeeper here in Australia so I’ve wanted to make mead for a while but was put off by the size and amount of equipment needed ( beekeeping equipment takes up enough) I’ve just made my first batch with some fresh ginger and a little slice of lemon. Fingers crossed thanks again!
followed the instructions and a few hours later I don’t see any bubbles yet. should I add more yeast?
Give it 24 to 48 hours, sometimes it takes a bit longer. At that point though, I’d say you have dud yeast.
I am at 48 hours for my first batch of 3 quarts of mead. I flavored all three with different teas. I am seeing some very small bubbles floating up to the top in all three. But I would not at all say it’s volitile or super active. I used a sparking champagne yeast. I am afraid I may have pitched it when the mixture was still a bit too warm. If the gas doesn’t pick up in production, should I just pitch more yeast?
It certainly wouldn’t hurt.
Thanks for sharing your method. Very low barrier of entry, great stuff! My two quarts are merrily bubbling along. I was wondering if it’s possible to add flavouring between primary and secondary fermentation? Something like freshly squeezed apple cider or elderberry lemonade. I guess the sugars would kick off more fermentation, but I’m more worried about spoilage.
Yes, you can definitely add flavoring between primary and secondary. That’s often when I add aromatics (chamomile, vanilla, etc) because the flavors infuse better that way. Primary fermentation blows off a lot of the delicate volatile compounds as it ferments pretty violently, so you want to add more delicate flavors into secondary.
Adding things with sugar will kick off more fermentation, but that’s ok, and shouldn’t cause any issues spoilage wise (so long as what you add is fresh and not already spoiling). Just be aware you may need to give it more time to finish, or rack into a 3rd container for another round of fermentation/settling before bottling.
I just came across this. I have a bunch of half-gallon mason jars. Maybe an obvious question, but if I were to make a half-gallon, do I just straight up double the recipe?
Yup, that’s exactly right!
Should my mead smell like beer when racking after the primary fermentation into clean jars?
Yes. It puts off a very yeasty (beer like) sell in the early stages. Fruit wines do too. That will go away in the bottle ageing later.
Thank you for this “how to make mead micro batch”. Really would like to try this. Ordered the yeast from Amazon and waiting for it to arrive. Just to check how much yeast to use for a quart jar. Thank you.
A tiny pinch is all you need. A full packet is good for a 5-gallon batch, and there are 20 quarts to 5 gallons. It’s not necessary to be exact, but I’d guess you could easily get 8-10 batches from a packet in pinches.
Thanks for reply….
Just summarising the ingredients for
Quart size Honey mead
1/4 to 1/2 cup of fruit (primary)
rehydrate the yeast (a pinch) in a small amount of water, for a quart about a 1/4 cup
2/3 (dry) of a cup to 1 full cup of honey
filled boiled water into the jar until it’s about 3/4 of the way full
is this alright?
Thanks
Yup, that sounds great. You can use more fruit if you want, up to a cup or so depending on the fruit. Make sure the boiling water has cooled completely before you add the dissolved yeast into it (or they’ll die). Allow it to cool to room temperature, or at least no more than around 90 degrees, before adding them in.
Sounds like you’ve got it. Good luck!
hehehe. just started my first mead. I will add fruits at the secondary. hope it works out…..
Hi
2 weeks into the mead making. I added fruits(blueberry) and fruit juice (apple juice) after 1 week. Now at 2 weeks it is still bubbling away. I can smell the alcohol now. Question. When should I remove the fruits? After removing the fruits and moving the mead over to a new container, let it do the secondary ferment. Can I add in a little more fruits or herbs at the secondary? 4 weeks to 2 months for secondary? How do you also clarify the mead? Sorry, for asking so many questions. thank you for this amazing experience in mead making.
Honestly, it’s really variable and up to what you want to do. Generally, you remove the whole fruits before secondary so any solids can drop out of suspension and cause the mead to clear. That said, if you’re adding herbs or aromatics, it’s good to add those after the very active fermentation is over so they don’t all bubble off into the air. If you want to add more fruits later, no problem. Herbs later, no problem. The thing is, if you’re adding anything with more sugar though, like fruits, you’ll need to strain them out and give it some time with nothing in it to clarify and finish fermenting before you bottle it.
I know, that’s not very good guidance, but really, it’s a fluid process and you can more or less play around with it and find what works for you. So long as you’re not introducing contamination and you keep things pretty clean, the skys the limit.
So, I finished my first 6 2 quart batches. If anyone wants to try Cardamom, open one pod per quart and put the seeds in the primary – an Indian friend advised my and it worked well … except that it turns out that I don’t much care for cardamom, lol. Saffron, however, tastes very good in meade. Still experimenting on quantity. You were right about the cinnamon. I thought I knew better. I love cinnamon and thought leaving a stick in the primary would be fine. It wasn’t. I didn’t end up with much really good meade this time, but I learned a lot and I expect good things on my next batch. I’m looking for a good Saffron and Cinnamon Metheglin. Will let you know how it goes.
I’ve made a nice maple cinamon mead. If you want the cinamon taste, boil some cinamon sticks in water, then use this water to make the mead.
Thank you for this suggestion. I’m a cinnamon fan, so this is what I will do.
Hello. Thank you for the article. I have a batch of plain Mead I started 15 Jan 2022. I am not see the yeast bubble all that much. Maybe a little around the outside edge of the jar. When I give it a gentle swirl it fizzes like soda pop. Is this normal? I used Red Star Champagne Yeast, like the one in your link above. I used honey from my bees. I used distilled water. I bloomed the yeast is warm, not too hot, water before mixing it in with the honey and water. Did I not use enough yeast? I put what would be equal to a pinch of yeast. I’m on day three and would like to try to save it. I don’t have a lot of honey to waste. It goes pretty fast to friends and family😉. Thank you.
You want to be sure to rehydrate the yeast in a small amount of water before adding it to the honey water. You want to use about 1/4 of the packet of yeast for this size batch so you may need a little more. Also some people say that the lack of minerals in distilled water make it more difficult for the yeast to get going but it does sound like you have some action going so you should be ok.
Have you tried the pickeling lids from masontop? How were they?
Yes, those are a great option.
Hi there! For mead, do you recommend primary ferment for 2 weeks, rack, secondary for 2 months, bottle, then age a few weeks before enjoying? Just trying to get all the timing right before trying this awesome recipe you’ve shared with us!
Thanks! ~Annie
Yup, sounds right to me!
Thanks so much! It’s looking good so far. I’ve got 4 different micro batches going – all your recipes. Mead, Raspberry Mead, Dandelion, and Lilac. I will report back how they all (I) do!
Wonderful! I’ve got three new ones bubbling away on my counter right now, and there’ll be more fun recipes up soon =)
Yum! I’m looking forward to seeing whats coming up next on your site!
Wait, secondary for 2 MONTHS or 2WEEKS? The post says the total time would be 4-6 weeks before bottling. Now I’m confused.
Either! Secondary should be at least a few weeks, but can go MUCH longer. I’ve had 5 gallon batches of mead in secondary for nearly a year and they improved in that time. That said, for a micro batch, that’s a lot of time to wait for a single bottle…
The whole timing on the process is pretty fluid. Start with 1-2 weeks in primary, then rack it over to a clean container after things settle down. Leave it in there for at least 2 weeks, preferably longer, like 4 to 8 weeks. Then bottle and wait at least 2 more weeks before drinking it.