Affiliate disclosure: This post may contain affiliate links. Please see our Privacy Policy.
Gravity-fed household water makes off-grid living much easier and more practical, as running water saves an incredible amount of time and labor each day. Hauling water is one of the most labor-intensive parts of living without electricity, and a gravity-fed system is essential for quality of life in the long run.
When I met my husband, he was living in a shack in the middle of the woods in Vermont. I don’t use the term “shack” lightly, and there was literally a hole in the roof of one room large enough to fit a cow through. At least, the hole was there when he moved in…and it was one of the first things fixed.
It was attached to a falling-down barn, built as a haphazard addition by some frugal hippies in the 70s. The place was abandoned but still owned by a friend of his, and they asked him to come to caretake the property.
Rustic to say the least…but it had running water from a gravity well that was put in nearly 100 years before to supply the barn. A spring up on a hill at the back of the 40 acres behind the house was tapped, and the pipe laid all running downhill….meaning water without electricity.
Before electricity, gravity wells and gravity-fed water systems were godsends to overworked rural populations, and they saved many hours a day. Hauling water is incredibly labor intensive, and using a gravity-fed water system is the perfect way to work smarter, not harder.
Now, more than a decade later, we’re living in what I call a “luxury off-grid” setup, with not only running water, but a dishwasher and all manner of other bells and whistles. The well pump uses more electricity than just about anything else, and I really wish we had a gravity well, or some kind of gravity-fed off-grid water system.
Not everyone has a perfectly positioned spring in their back 40, but that doesn’t mean you can’t setup a gravity-fed water system for your offgrid homestead.
The actual plans for this gravity-fed off-grid water system come out of one of my favorite off-grid book resources, The Doable Off-Grid Homestead. They homestead in Texas, where water is scarce, but they’re still able to setup running water using gravity.
Just about everything in this book is done with practical ingenuity and on a shoestring budget, so it’s one of the best ways to bring running water to an off-grid homestead without spending a lot of money.

Reprinted with permission from The Doable Off-Grid Homestead by Stewart and Shannon Stonger. Page Street Publishing Co. 2018. Photo credit: Shannon Stonger. It has been edited slightly for format and length to fit the web.
Gravity-Fed Household Water
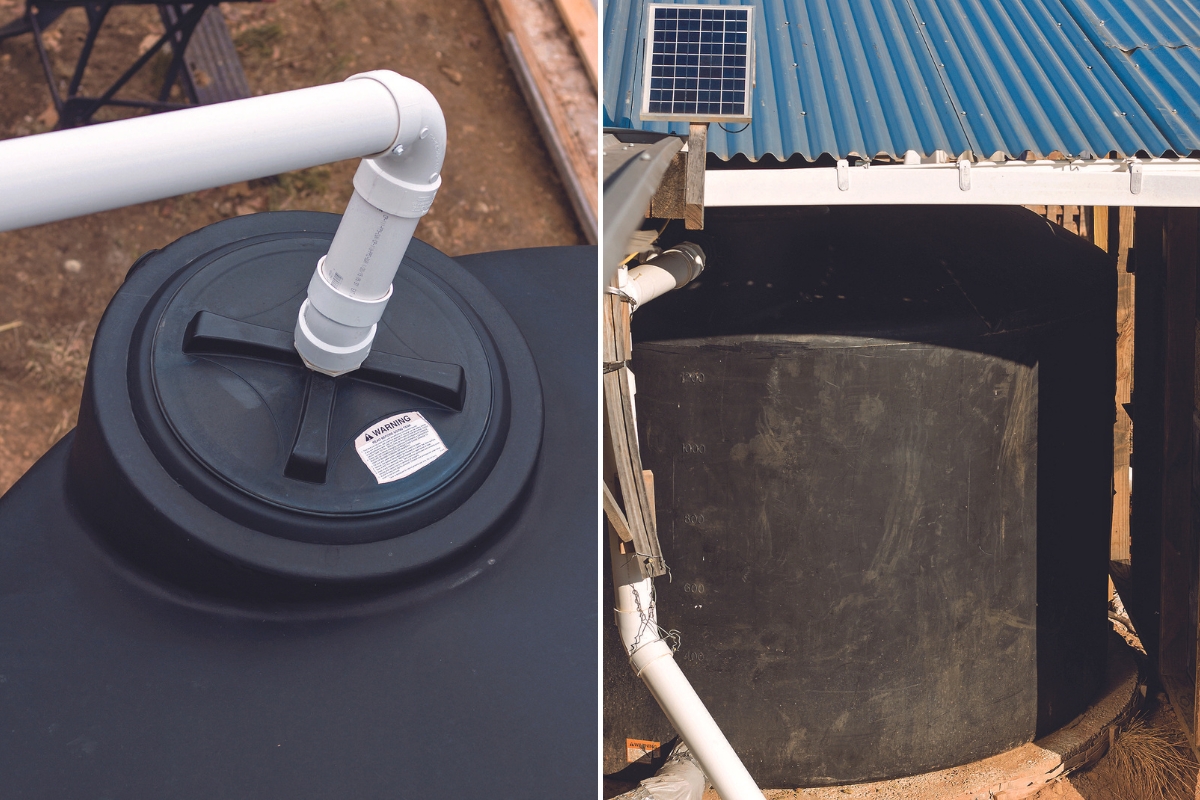
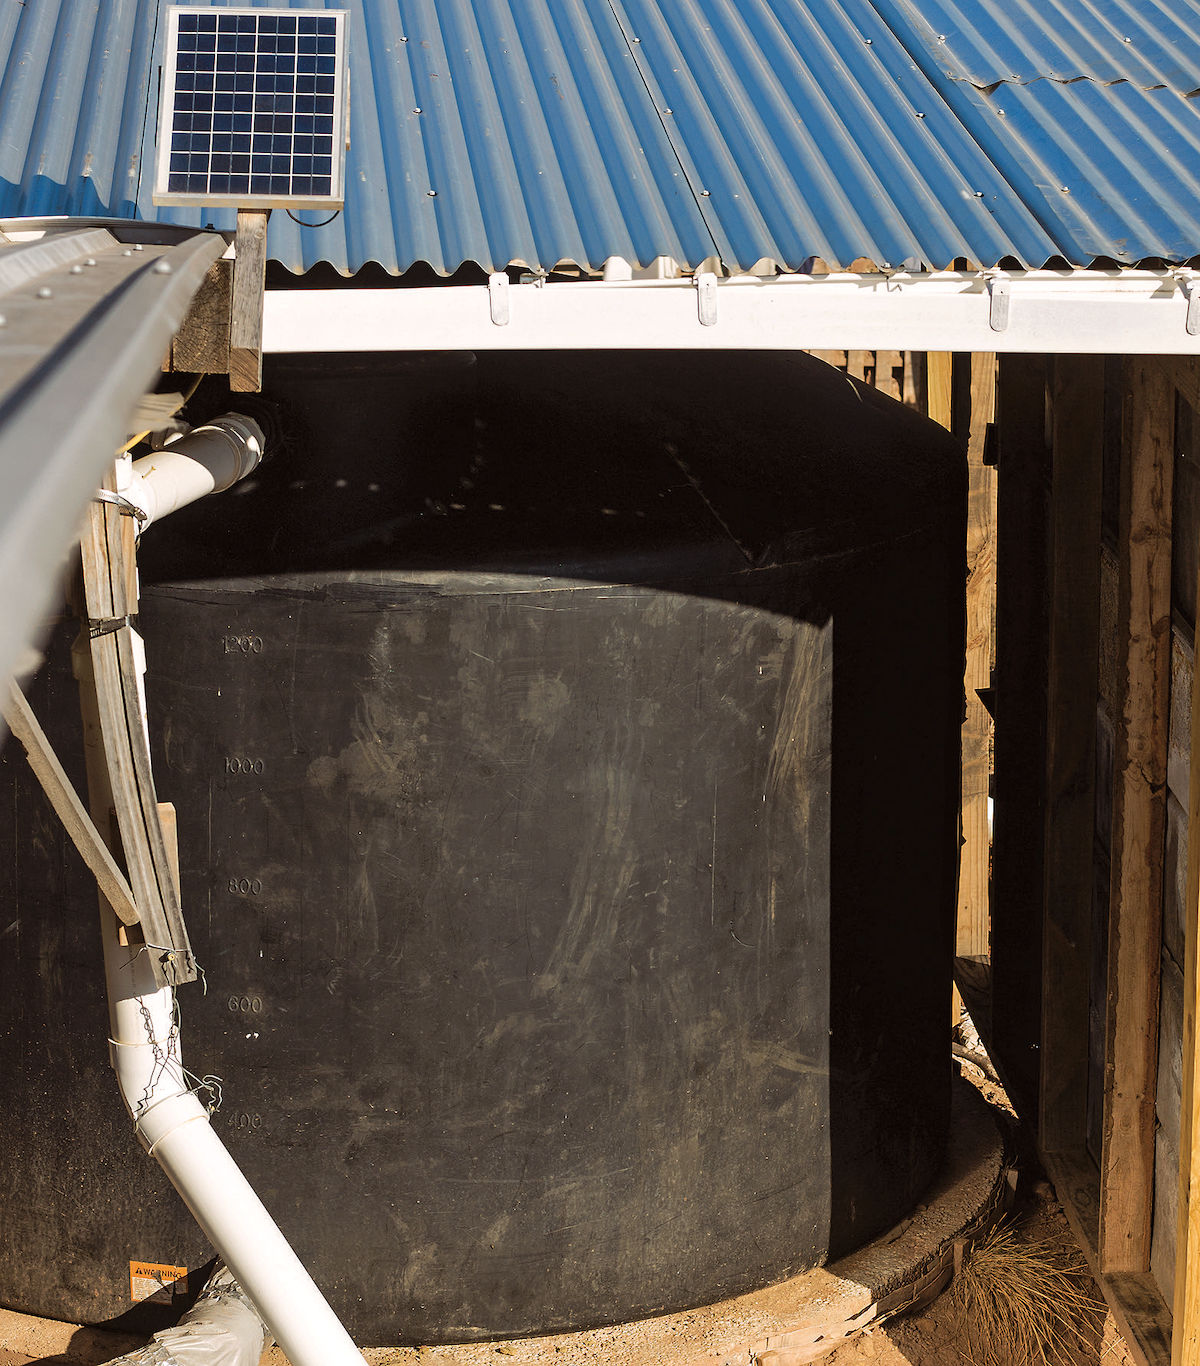
If you are wondering how efficiently this simple setup runs, when our 1,500-gallon (5,678-L) tank is half full (around 700 to 800 gallons [2,649 to 3,028 L]), we have 2 gallons (7.6 L) per minute at our laundry sink and around 1¾ gallons (6.6 L) per minute at the kitchen sink through our garden hose outlet.
Critical: If you are planning to build a home that will input gravity-fed water, be sure to plan ahead and build a high enough roof so that the bottom of the tank is above your water input level (i.e., sink or bathtub).
Tools and Materials
• Level
• Dirt
• 12 to 14 grade stakes
• ¼-inch (6-mm) thick plywood
• ½-inch (13-mm) screws
• Drill
• 3/8-inch (9.5-mm) rebar
• 20 to 25 (80-lb [40-kg]) bags ready-mix concrete
• 1,500- to 3,000-gallon (5,678- to 11,356-L) water tank
• Solar water pump, optional
Setting Up an Off-Grid Water System
While this is not the only way to set up an off-grid water system, this is step-by-step instructions for how we set up our off-grid water system in Texas. Obviously, you’ll have to adapt to your own conditions and available resources, but you can use this as a starting point.
Create a platform for your tank
Our “water tower” is simply a hill of dirt we piled up with a backhoe. Be sure to build the tower at a slightly higher elevation than where your water output is going (i.e., a sink or bathtub). When deciding how high to elevate your tank, remember the tank has to be below the level of your roofline if you are directly catching rainwater into it. Also, consider your water-pressure requirements. You can have fairly low water pressure that still fills things fairly quickly by using a larger-volume pipe. If you can live with this, you can reduce your water tower height considerably.
Level the dirt pile out and prepare a form by staking out a circle that is at least 6 to 12 inches (15.2 to 30.4 cm) wider in diameter than your tank. Pound in stakes around the outside of the circle. Cut the plywood into strips 6 inches (15.2 cm) tall. Shape these inside the stakes to create the outer edge of the circle. Screw the plywood into the stakes in a manner that the tops of the plywood strips are level. Add rebar as desired for extra strength.
Next, mix the concrete according to the manufacturer’s instructions and pour a smooth, level slab inside the form. Let the concrete dry and cure completely before moving the empty water tank to the platform. You can place a small roofline over this tank to protect the hill from erosion and the tank from sun exposure.
For a pump-assisted gravity-fed water system, install a solar-powered water pump. Use this to pump water from other catchment tanks up to the elevated tank when the upper tank runs dry.
Pipe the water into the house
Keep in mind that standard faucets have very restricted piping because the city water pressure is so high. For that reason, we like to employ laundry sink faucets and garden hoses. Run ¾-inch (19-mm) PVC pipe from the water tank to your laundry-sink faucet or garden hose. For water conservation purposes, we also have a regular faucet in the kitchen sink that, due to its low flow rate, works well for handwashing.
For a smaller-scale water tower, create a 12-foot (3.6-m) platform using 4 x 4s. Elevate 1 or 2 55-gallon (208-L) food-grade plastic drums and pump or manually move water to these drums every few days.
This setup, whether with a large volume water tank or just a 55-gallon drum, should be sufficient to provide gravity-fed water to an off-grid sink or two. It takes a while to setup, but it’s well worth it. If you’re just looking for a small amount of gravity-fed running water to have a camp kitchen setup, then try a simple bicycle wheel water lifter setup instead.
Bicycle Wheel Water Lifter
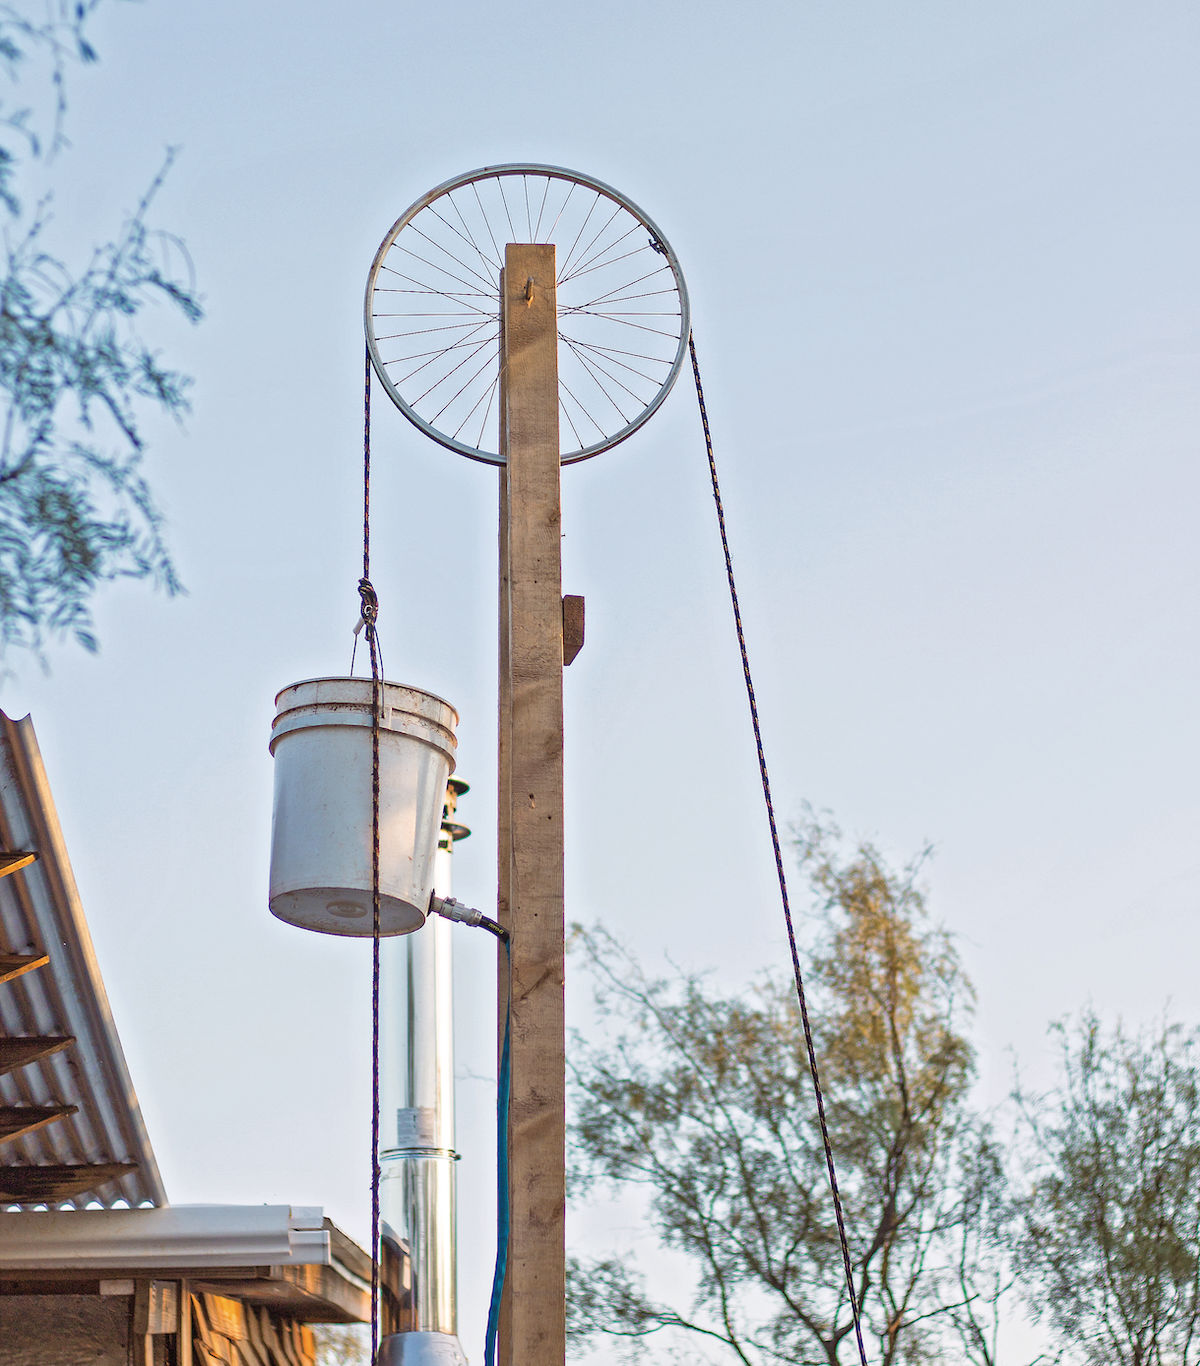
Surely there must be a simple solution for moving water anywhere on your property without a solar- or wind-powered pump, or even a manual water pump, for that matter. This simple concept does just that—and it’s easy. You get the biggest bicycle wheel you can find and turn it into a pulley. Put the pulley on top of some type of pole or tower setup, then pull a bucket of water up via a rope. But, you say, lifting water vertically does nothing for moving it horizontally, right? Actually, it does if you have a hose connected to the bucket that can divert water to wherever you want it.
Your distance for moving the water is only limited by your tower height. The volume you can move at once is mostly limited to the size of the bucket. For example, if your tower and wheel were strong enough, you could lift a 10-gallon (38-L) bucket instead of a 5-gallon (19-L) bucket.
Estimated Time: 4 hours (it will vary based on your support design)
Estimated Cost: Depending on what you have around, it could be cheap. You can get used bicycles at thrift shops, or you may just have an old one around. The only other expense is building your pole or tower, but if you have scrap wood around this won’t cost much.
Tools and Materials
• 4 x 4 posts and 2 x 4 boards, as needed
• Large bicycle wheel
• Drill and bit sized to fit the rebar
• 1¼-inch (3.2-cm) drill bit or hole saw
• Rebar cutters, hacksaw or reciprocating saw
• 3/8-inch (9.5-mm) rebar
• 2½- to 3½-inch (6.4- to 8.9-cm) screws or nails
• 5-gallon (19-L) bucket
• ¾-inch (19-mm) Uniseal
• 4-inch (10.2 cm) piece of ¾-inch (19-mm) diameter PVC pipe
• ¾-inch (19-mm) diameter PVC to garden hose adapter
• PVC primer and glue
• Garden hose
• Rope twice as long as your tower is high
• Shovel and mixing hoe, optional
• Concrete, optional
How to Build a Bicycle Wheel Water Lifter
Start by building a post or tower that will hold the bike wheel pulley. To do this, you could put a 4 x 4 post in concrete or be creative and come up with any method that will hold your pulley as high as you want the water to be lifted. In my first design, I used scrap 2 x 4 boards that I secured to our cabin.
Remove the rubber tread and tubing from the bicycle rim and cut 2 (2 x 4) boards of equal length that are at least 1 foot (30 cm) longer than the radius of the bicycle rim.
Line up the 2 x 4 boards and drill holes near the end in the same spot on each 2 x 4 where the rebar will go through to support the bicycle rim. These holes will support the pulley axle.
Cut some rebar long enough to go through both 2 x 4 boards and the bike rim. This will probably be at least 8 inches (20 cm) long (maybe a little longer).
Make the “pulley sandwich” by putting the rebar through the first 2 x 4, through the bicycle rim’s center hole, and then through the second 2 x 4.
Attach these 2 x 4 boards to the top of your 4 x 4 post vertically on opposite sides of the post using screws or nails. Use extra material as needed to attach or reinforce this connection if you built a custom tower.
Drill a 1¼-inch (3.2-cm) hole in the side of the 5-gallon (19-L) bucket near the bottom and install the Uniseal in the hole you just cut. Insert the ¾-inch (19-mm) PVC pipe into the Uniseal (use soapy water as needed to help it slip through) and attach the PVC pipe to the garden hose adapter. Use the PVC primer and glue to make the connection permanent as needed.
Attach a garden hose to the PVC pipe via the new adapter. Depending on the type of hose you are using, you may want to get a 90- or 45-degree garden hose fitting to ease the strain on the garden hose as the bucket is lifted.
Tie a rope to the bucket and feed the rope up and over the bicycle pulley. Tie off the other end of the rope to the post so that the rope won’t slip off or go slack. Putting a screw or nail into the post at the right height to tie the rope can be helpful.
Place the end of the garden hose where you want the water to go, fill the bucket with water and lift away. Hold the bucket up to the desired height until all the water drains out. To make it easier, you could add a simple clip or rope tie-off to the post to hold the bucket up while the water drains.
This is sufficient for a small “camp style” sink or shower, and will get the job done in a pinch without having to install a concrete slab for a permanent gravity-fed water system.
Off-Grid Skills Tutorials
Looking for more resources for your off-grid lifestyle?
- Off Grid Appliances
- Maintaining Off-Grid Systems in Winter
- Pedal Powered Washing Machine for Off Grid Laundry
- 10 Luxuries We Have Off Grid (That Most Suburban Homes Don’t)
- Raising Goats Off the Grid



I am looking for information on combining cranberries and fresh pineapple and caning it . Do you cook the pineapple first ? Some thing about bromeliad has me worried about fresh pineapple. Pba
Here is an article on canning pineapple. https://practicalselfreliance.com/canning-pineapple/ You can do a hot pack or raw pack either one for pineapple, although some people believe that hot packing yields a better result.