Affiliate disclosure: This post may contain affiliate links. Please see our Privacy Policy.
Canning potatoes at home is an easy way to preserve potatoes for long term storage. Pre-cooked and ready to use, home-canned potatoes make for quick last-minute meals right from your homemade pantry.
While I’ll can just about anything at home, I’ll admit that canning potatoes weren’t high on my priority list. Our basement stays a consistent 50 degrees year-round, and though that’s on the warm side for a root cellar, we’ve had great success storing potatoes with minimal work. Most years we put away about 200 lbs of potatoes in the fall, and with two potato loving children in the house, that stockpile rarely makes it to the following June.
If they’re so easy to store, why bother canning potatoes? Plenty of reasons!
Canning potatoes ensures you have a steady supply of potatoes into the spring and summer. Many varieties of potatoes won’t keep that long, even in the best root storage conditions, and only the very best storage potato varieties will last until the following year’s crop comes in.
Canned potatoes are the ultimate homemade convenience food. They’re shelf-stable, nutritious and ready to heat and serve. Warm the pieces in their canning liquid on the stove, strain and top with butter, sour cream and/or chives and you’ve got a satisfying homemade dish in no time.
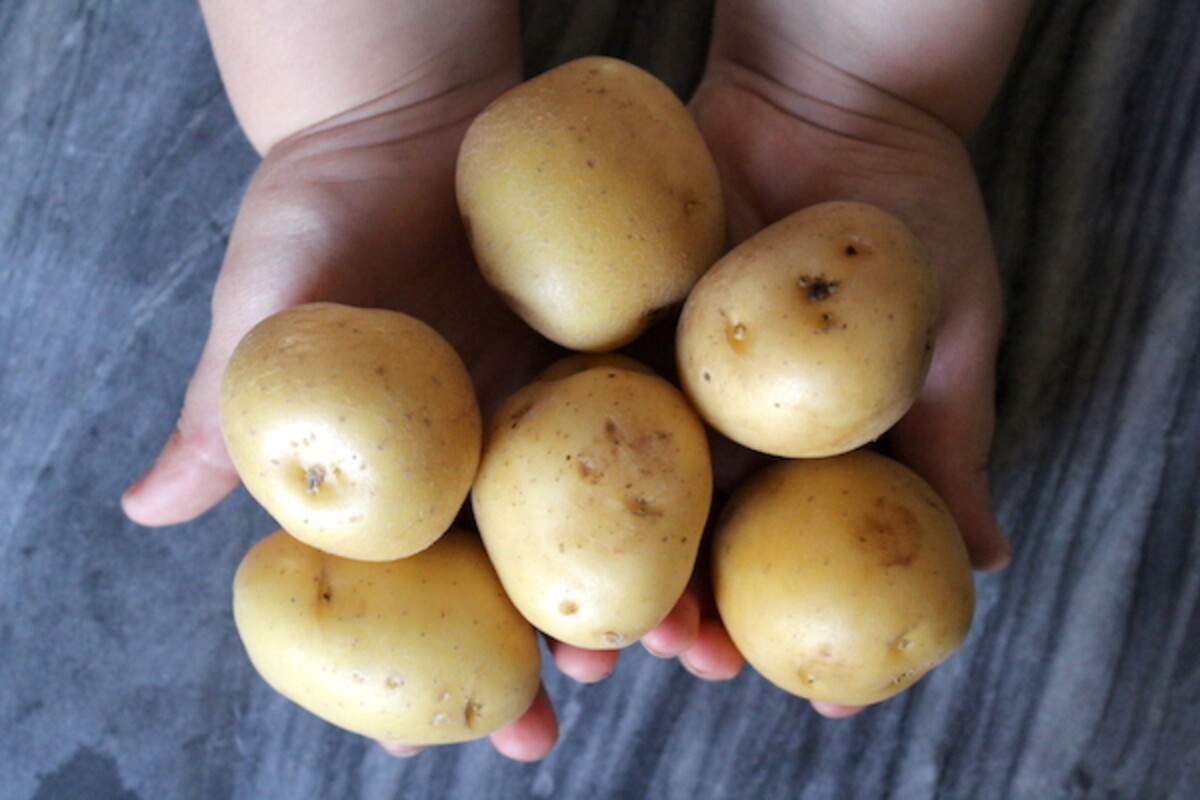
Small potatoes don’t store well in a root cellar, but they’re just the right size for canning. If you have a bumper crop of small spuds, it’s time to get canning!
This year, our potato crop yielded a lot of undersized potatoes, and while we usually eat those quickly and save the larger tubers for storage…there were just too darn many! While I ended up canning potatoes out of sheer necessity, I’m actually happy I did. They’ve been a lifesaver on busy weeknights, and next year I’m going to can up a larger batch.
I’m thinking of canning potatoes in meat stock as well so that I’ll have an easy versatile soup base too. We already pressure can bone broth and a separate batch of extra yummy pork stock every year, adding potatoes into the mix for a case or two should be easy enough.
Potatoes, believe it or not, actually require more time in the pressure canner than meat stock, so the instructions for canning potatoes would be the same whether you’re canning them in water or meat stock.
Supplies for Canning Potatoes at Home
To can pressure can potatoes, you will need:
- Either a Dial gauge or Weighted gauge pressure canner (I use this one)
- Jar Grabber (to pick up hot jars)
- Canning Funnel (optional with potatoes, but recommended for a cleaner pack)
- Large Slotted Spoon (for removing potatoes from blanching liquid, leaving the cooking liquid behind)
- 2 Large Pots (one for pre-cooking the potatoes, the second for boiling water to pack the potatoes)
- Cutting Board
- Paring Knife and/or Potato Peeler
It’s important to note that potatoes are a low acid food, and cannot be canned in a waterbath canner. They must be put up using pressure canning for safety.
How to Can Potatoes
All in all, pressure canning potatoes is pretty simple, provided you’re familiar with the basics of pressure canning. I’ll make no assumptions though, and take you through the process of canning potatoes step by step, and if you’re a seasoned pressure canner go ahead and just read the recipe card below.
Start by placing two large pots of water on the stove and bringing them to a boil. One is to pre-cook the potatoes, and the other is fresh, clean water that will be used as canning liquid in the jars. Do not re-use cooking liquid from the potatoes for packing.
While the water is coming to a boil, prepare your potatoes. Peel the potatoes, and chop any large spuds into 1 to 2” pieces. Smaller potatoes under 2” in diameter can be left whole, but still must be peeled. Place the potatoes in water to prevent browning while you work. Some sources recommend adding lemon juice to the water, but really just so long as there submerged they won’t brown and lemon isn’t really necessary.
Once the water is boiling, place the potatoes into the water and pre-cook for 2 minutes (for 1” cubes) or 10 minutes (for whole potatoes about 2” in diameter). Strain the potatoes after cooking and discard the cooking liquid.
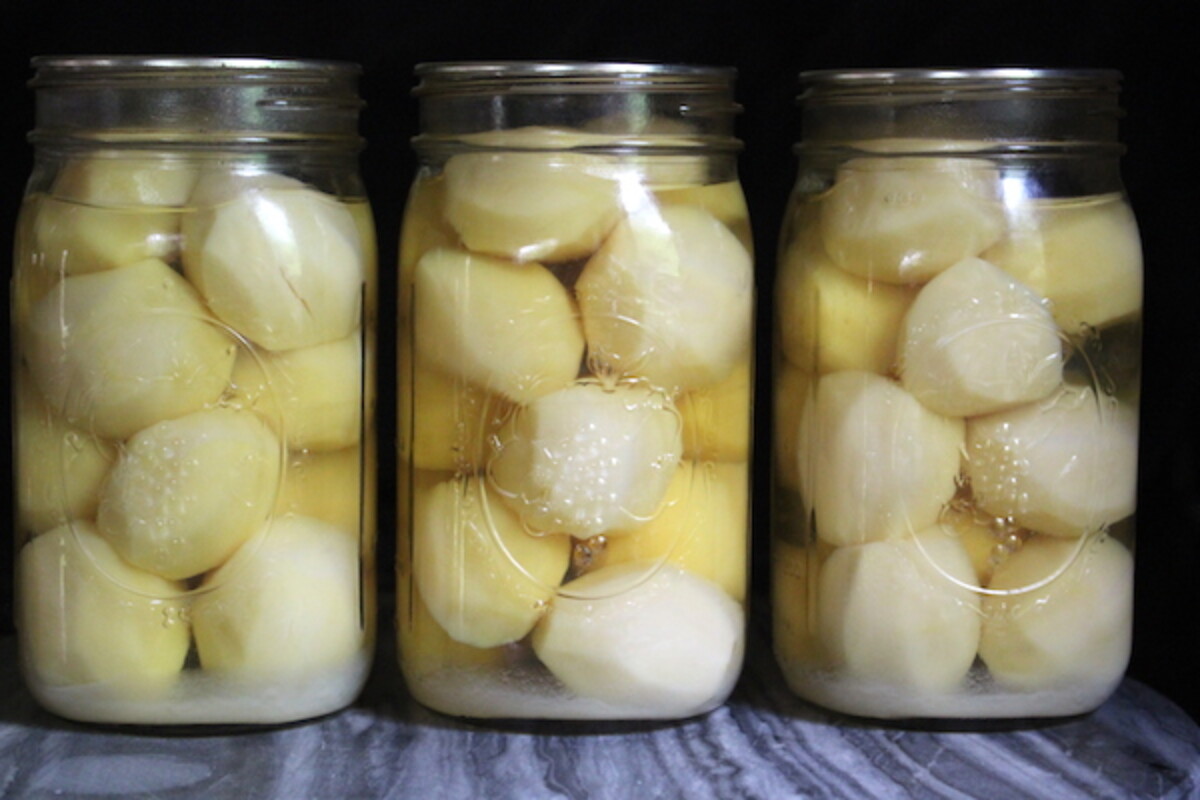
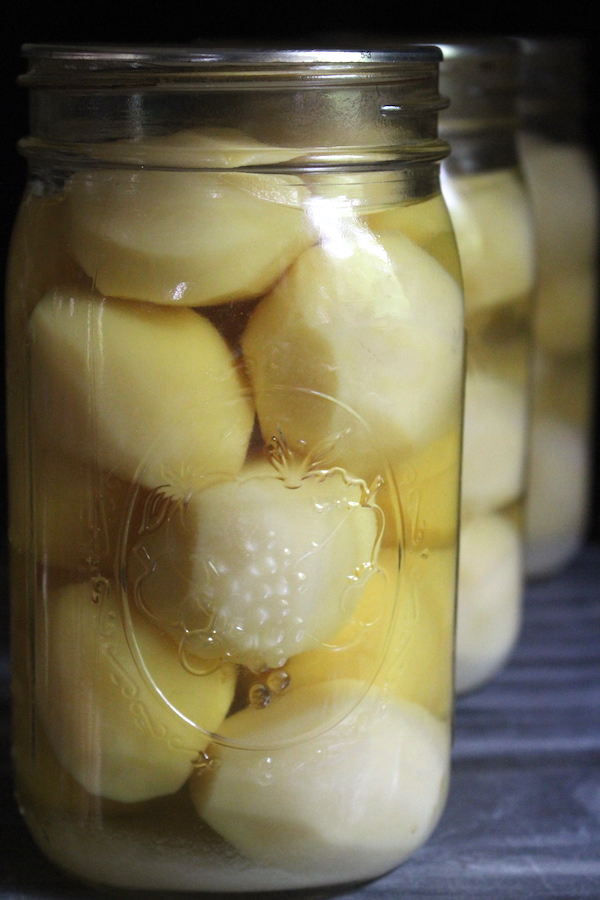
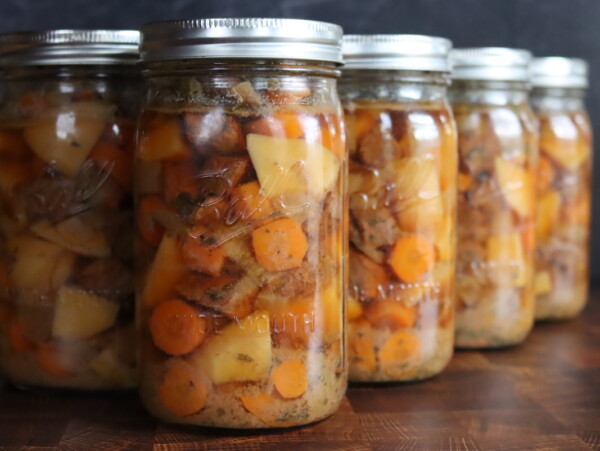
Pack the cooked potatoes into canning jars (pints or quarts, quarts recommended for efficiency), leaving 1” headspace. Cover with clean, boiling water (maintaining 1” headspace) and add 1 tsp canning salt per quart (optional). Wipe rims and apply 2 part canning lids, tightening to just finger tight.
Place your pressure canner on the stove and add about 2” of boiling water to the bottom from the clean boiling water pot. Insert the canning rack that came with the canner, and then load in the hot jars into the pressure canner.
Close the pressure canner and allow the steam to vent for 10 minutes before fully sealing with a canning weight.
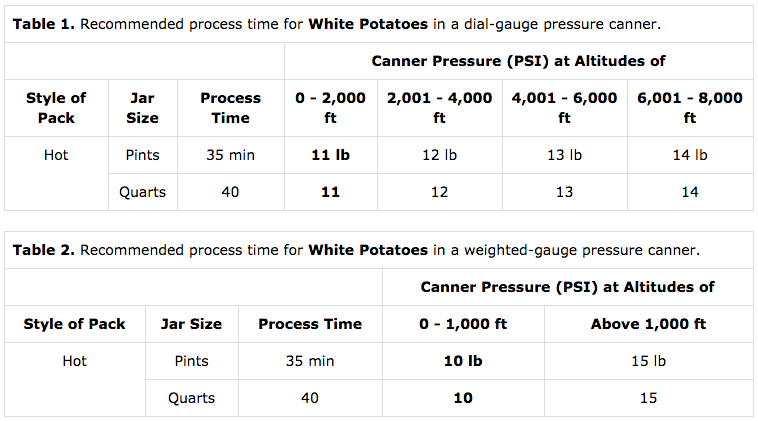
Allow the pressure canner to come up to pressure, and begin timing once the required pressure is shown on the gauge. When canning potatoes under 1000 feet in elevation, set the pressure canner to 10 pounds pressure and process for 35 minutes (pints) or 40 minutes (quarts). For other altitudes and when using a dial gauge pressure canner, see the table below for the appropriate times/pressures for canning potatoes:
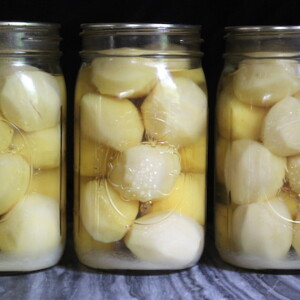
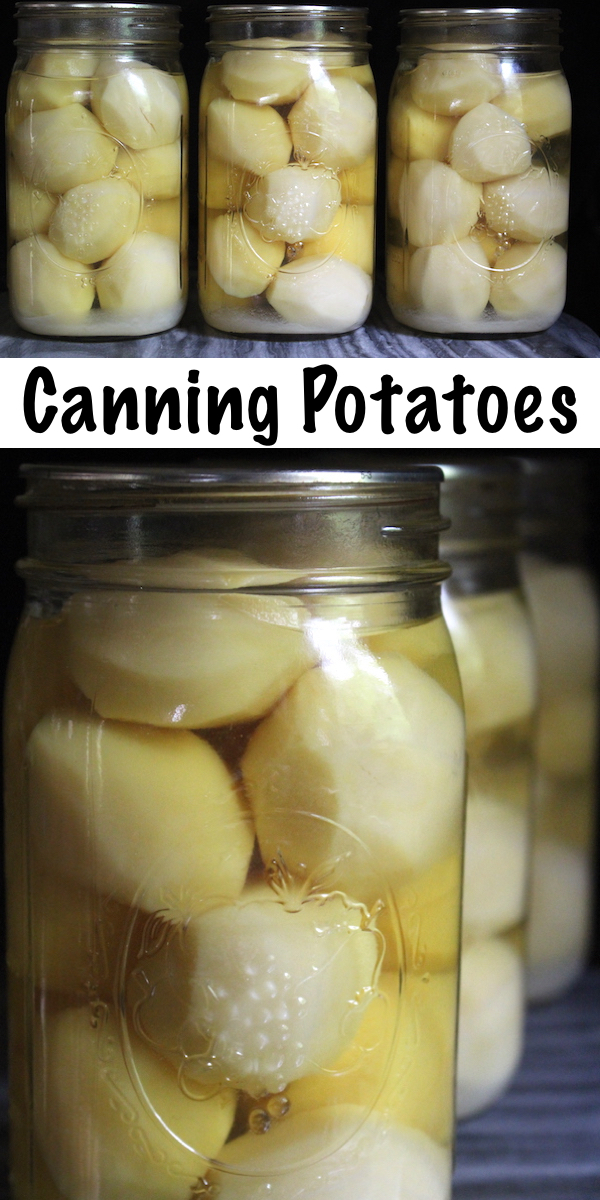
Canning Potatoes
Equipment
- Pressure Canner
Ingredients
- Potatoes, see notes for quantity
- Canning Salt, optional ~ 1 tsp per quart, see note
Instructions
- Place two large pots of water on the stove and bring them to a boil. One is to pre-cook the potatoes, and the other is fresh, clean water that will be used as canning liquid in the jars. Important: Do not re-use cooking liquid from the potatoes for packing.
- While the water is coming to a boil, prepare your potatoes. Peel the potatoes, and chop any large spuds into 1 to 2” pieces. Smaller potatoes under 2” in diameter can be left whole, but still must be peeled. Place the potatoes in a bowl of water and keep them submerged to prevent browning while you work.
- Once the water is boiling, place the potatoes into the water and pre-cook for 2 minutes (for 1” cubes) or 10 minutes (for whole potatoes about 2” in diameter). Strain the potatoes after cooking and discard the cooking liquid.
- Pack the cooked potatoes into canning jars (pints or quarts, quarts recommended for efficiency). Leave 1” headspace.
- Cover with clean, boiling water and add 1 tsp salt per quart (optional).
- Wipe rims and apply 2 part canning lids, tightening to just finger tight.
- Place your pressure canner on the stove and add about 2” of boiling water to the bottom from the clean boiling water pot. Insert the canning rack that came with the canner, and then load in the hot jars into the pressure canner.
- Close the pressure canner and allow the steam to vent for 10 minutes before fully sealing with a canning weight.
- Allow the pressure canner to come up to pressure, and begin timing once the required pressure is shown on the gauge. When canning potatoes under 1000 feet in elevation, set the pressure canner to 10 pounds pressure and process for 35 minutes (pints) or 40 minutes (quarts). For other altitudes and when using a dial gauge pressure canner, see the table above for the appropriate times/pressures for canning potatoes.
Notes
Frequently Asked Questions
Whether you’re canning chopped potatoes or canning whole potatoes, you’ll want to choose a variety that can withstand the heat in a pressure canner without falling apart. Some varieties are bred to yield a starchy, light and fluffy baking potato, like russet. Similarly, others are great for mashed potatoes and fall apart easily during boiling. Avoid any variety of potato that falls apart during cooking and especially starchy varieties.
Choose firm-fleshed, waxy potatoes for canning. According to the National Center for Food Preservation’s blog,
“White potatoes for canning should be the “waxy” or “boiling” kind. Different types of potatoes have different amounts and types of starches and they react to heating differently. You want a potato that keeps its shape and texture well after a lot of heating, and not one that falls apart becomes “fluffy” after cooking, and is better for mashing. Most red-skin potatoes are of lower starch than baking potatoes and work well for canning. Many white round potatoes with thin skins fall into this category with red-skin potatoes too. Russets are not good for canning but are good for baking (they have a high starch content). Yukon Gold may not be the best potatoes for canning. While they seem good for boiling, they do tend to fall apart when overcooked. From what we have read, there is a wide variety in the types and amounts of starches in blue potatoes, so not all blues are the same, just like not all white potatoes are the same in these characteristics.”
Beyond that, new potatoes harvested young and small tend to contain less starch than fully grown “adult” potatoes. If you’re planning on canning up large amounts, start harvesting early and you’ll limit the starch content of the potatoes and improve their canning quality.
Think about any potatoes you’d use to make a good, firm potato salad and you’ll be all set.
Skipping the peeling step would save a lot of prep time before actually canning potatoes, but canning potatoes with the skin on is not recommended for several reasons…
Primarily, safety. All the testing around canning times for potatoes was conducted using peeled potatoes. Botulism spores actually live in the soil in contact with potato skins, so leaving the skin on the potato might make a difference in the total canning time. According to the National Center for Home Food Preservation, potatoes should be peeled before canning because:
“That style of preparation is how the research was carried out to determine the recommended processing, and in order to know that the peeling does or does not make a difference, research would need to be done with unpeeled potatoes. Different assumptions might be needed in assessing just how many spores of C. botulinum or other bacteria might be present at the start of the process and what amount of heat might be needed to meet standards for the risk of possible survivors. We do not know of research of canning potatoes with peels left on, so we recommend the preparation steps provided with the process recommendation, especially because there is a possibility that the deviation could result in a less safe situation.”
Reading that, it sounds like the NCFP is trying to cover all the bases, and is really being overly cautious here. Realistically, the skins likely don’t make that much difference assuming they’re well-scrubbed. Know that it’s just not a tested canning recipe, and you’ll have to use your own best judgment for your health here.
That said, beyond safety, peeling potatoes before canning is just a good idea. Canning potatoes involves high heat in a pressure canner, and those skins are likely just going to fall off in the jar anyway and make a big mess. When you’re dealing with homegrown potatoes, they’re also usually pretty dirt-covered and scrubbing off every last bit of schmutz would likely take just as long as peeling anyway.
So when you’re canning potatoes, you should be canning peeled potatoes!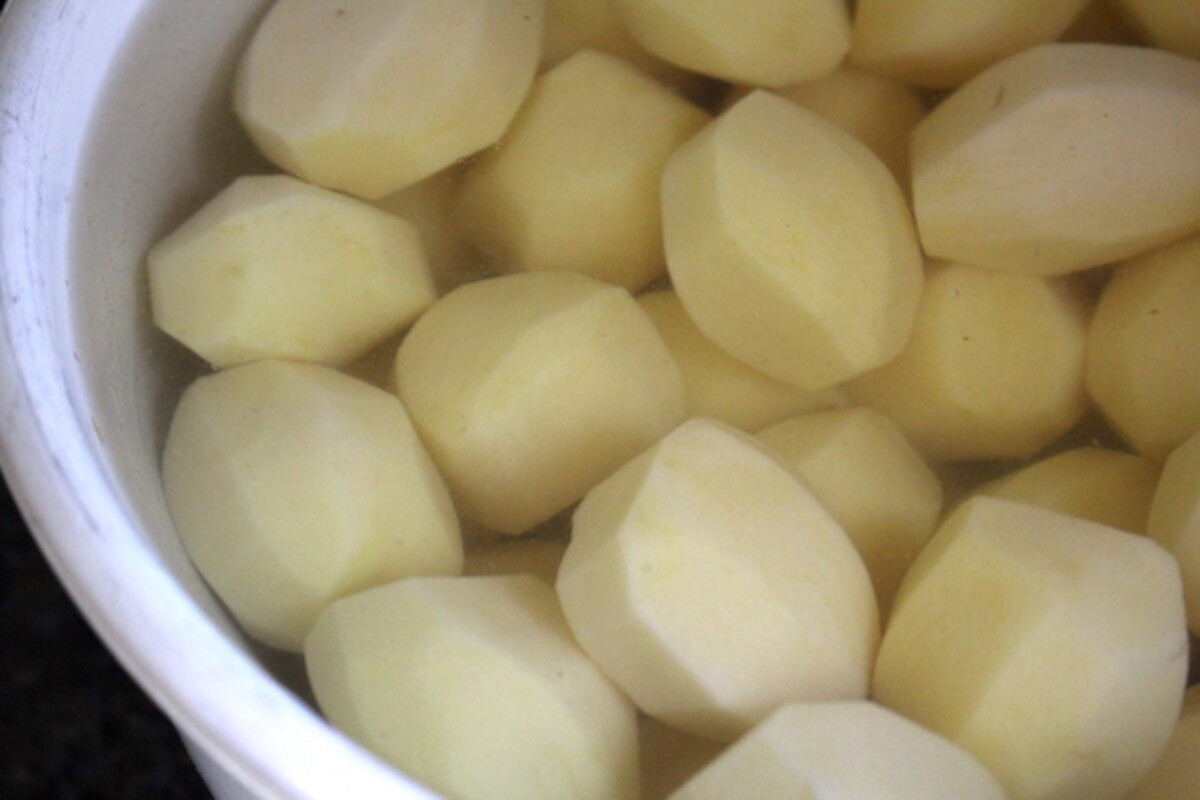
Canning potatoes raw pack is actually not a tested canning method (sadly). I love raw packing whenever possible, assuming it won’t impact quality (as it does when you’re canning peaches), but when canning potatoes all the tested recipes being with hot pack or cooking the potatoes first.
Potatoes are dense, and it can take a substantial amount of time to heat a potato through to the center in a pressure canner. If you’re raw packing, it’s possible that you’re not holding the potatoes at a high enough temperature for a long enough time for safe canning.
Start by boiling the potatoes for 2 minutes for 1/2 inch to 1-inch cubes. For whole new potatoes about 2” in diameter, the recommendation is to parboil them 10 minutes. Pack the hot potatoes into canning jars, and cover with boiling water (don’t use the water you boiled the potatoes in for best quality, it’s full of starch).
Commercially canned potatoes in tin cans are rated for 3-5 years, but generally, the advice for home canners is to consume home-canned potatoes within 12 to 18 months. Ball canning just introduced new canning lids that are guaranteed for 18 months, and that is the current recommendation when using the newer lids.
Practically speaking, canned potatoes last much longer. After about a year I’ve found that most pressure canned foods tend to lose quality, but slightly lower quality doesn’t mean it’s not safe to eat. Assuming the seal is unbroken and the potatoes were properly pressure canned, they should last quite a long time.
Strictly speaking, salt isn’t required to safely can potatoes. It’s perfectly fine to can potatoes without salt, but I don’t recommend it. Potatoes taste best with salt, and the salt helps them maintain good texture during the canning process. If you’d like to use less salt, go right ahead. The general recommendation is 1 tsp per quart jar, but feel free to reduce it based on your tastes.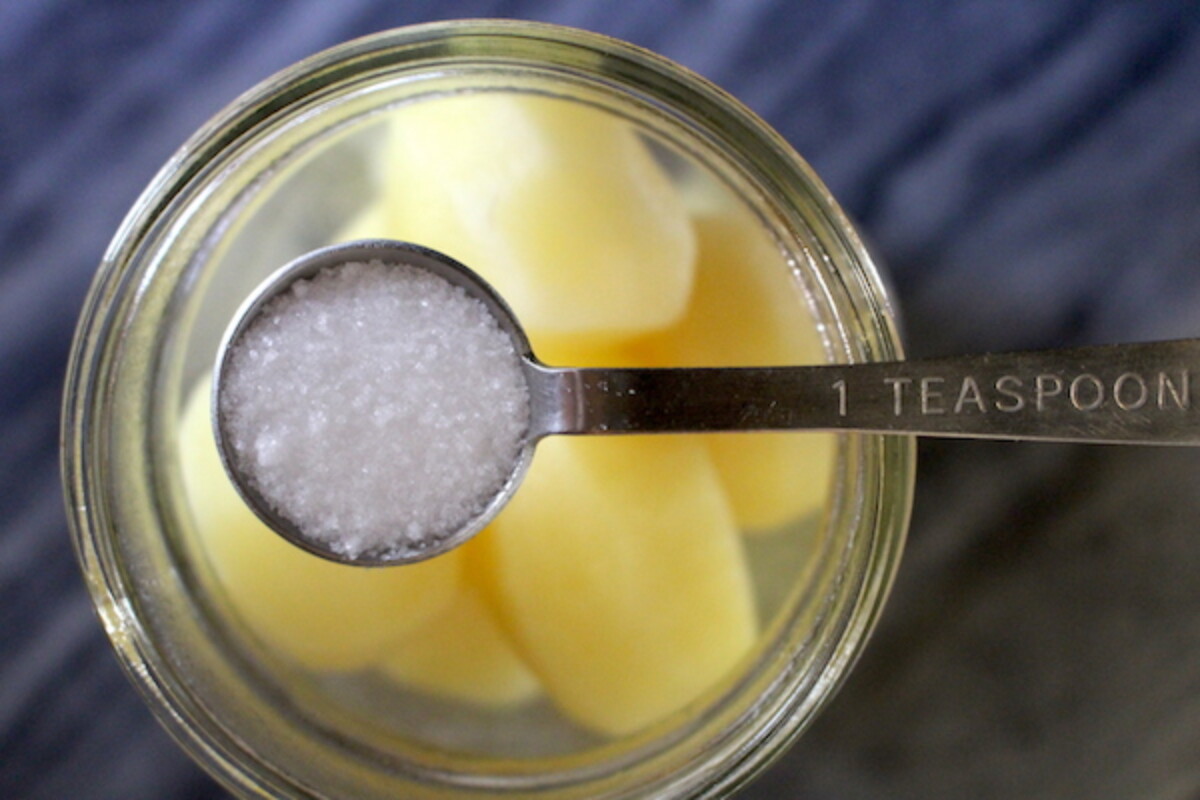
Pressure Canning Recipes
Looking for more simple pressure canning recipes? Here are a few to keep you preserving…


I have been wanting to start canning I have all the supplies etc. I gave made jam and apple butter. I have a pressure cooker and everything, a older weighted one.
Any who, I just want to say that reading exactly step by step, the way u explained everything. Just reading it made me, less nervous to try it. I have been nervous about it, I have a baby and have heard how they are dangerous. Blah blah, but that is why I haven’t tried yet
Just wanted to say I appreciate it and thank you.
I
You’re very welcome. We’re so glad to hear that. Please come back and update us after you have canned your first batch.
A weighted pressure cooker does not have a gauge how do I no how much pressure I have. How do I use it
This pressure canning guide for beginners will explain everything that you need to know. Let us know if you have any other questions.
Thank you for this post. I plan on following your directions to pressure can some peeled red potatoes. I was wondering if I could put some sliced onions in with them- not a bunch, but maybe a tablespoon-ish per jar? I have a few other recipes for things such as salsa and baked beans that I got from one of my Ball books that use onions. But I don’t want to risk hurting my family.
When you are wanting to combine foods like this you just want to be sure that all of the food items can be safely canned with the canning method that you are using. Then you want to use the processing instructions for the food item that needs the longest processing time.
So… why don’t you use the same water you boil the potatoes in??
This is my first year using a pressure canner AND canning potatoes. I inherited this canner from my mom. I’m pretty sure that it was my grandmother’s. After testing the gauge (spoiler alert – pun intended) it was way off. So I picked up Presto’s conversion kit, which included a book titled Recipes and Helpful Hints for Presto Pressure Canners, along with the parts I needed to accommodate a replacement gauge.
Back to the potatoes; I found conflicting recipes calling for fresh boiling water (ball blue book guide to preserving, 2013), using the same water the potatoes are boiled in (recipes and Helpful Hints for pesto canners, 2021), and either option (ball blue book guide to preserving, 2014). Ultimately, I settled on using the cooking liquid because Presto’s guide states, “Whenever possible, the precooking water should be used as as liquid to cover the vegetables after packing into jars. However there are a few vegetables, such as greens and asparagus, which make the water bitter and undesirable to use.”
Is there going to be a taste difference? Are my potatoes going to be bitter? Or, is the primary reason to use fresh boiling water mainly to reduce cloudiness because of the added starch in the boiling liquid?
In this case, you’re removing the liquid because it’s full of starch. Some potatoes are REALLY starchy and it’ll make kind of a gel in there around the potatoes which would impede the canning process. That’s the exception, and most just result in cloudy water.
I just had an oops moment. Four years ago I canned potatoes for the first time. I canned white and red which were given to me. I peeled and cubed some of them, peeled and cut for scalloped potatoes, peeled small potatoes and left them whole, cubed unpeeled potatoes for stew and left small unpeeled potatoes which I canned. I washed the dirt off outside, rinsed them in the dishwasher and then washed the unpeeled again with a vegetable brush and peeled the rest. I had not read canning unpeeled potatoes was a no-no. In the meantime I have used the cubed, unpeeled potatoes multiple times when making vegetable beef soup. And I also used up all the jars of potatoes I cut for scalloped potatoes. We didn’t get sick. Now I have just been given a large quantity of potatoes again. Did I just have good luck the first time leaving on the skin or is it safe if one is diligent in preparation?
I would personally recommend that you peel all of your potatoes to be on the safe side. It’s possible that you may not get sick but I wouldn’t want to risk it myself. Botulism can be fatal. It’s good that you didn’t get sick before but now that you know the safe way to can potatoes I think it’s a good idea to follow those guidelines.
Thank you for your post Ashley. It is very informative and detailed. I have never used a pressure canner but I am hoping to buy one soon. When using the water bath method we are instructed to cover the filled jars with water (approx 1-2” above the jar) before starting the cooking process. I noticed the instructions for pressure canning potatoes suggested adding 2” of water to the bottom of the canner then add the jars. I am assuming no additional water is required. I Just wanted to make sure I didn’t miss something. Thank you.
Yes, that is correct. If the water depth is not specified then the standard depth is 2 to 3 inches.
I do not discard the water I boil my potatoes in, I cook it and use it to make bread.
That’s great! Thank you for sharing.