Affiliate disclosure: This post may contain affiliate links. Please see our Privacy Policy.
If you’ve ever tried to catch wild game with your bare hands you already know that the ability to hunt at a distance can mean the difference between a meal and disappointment. Most of the time anyway.
I have an old Vermonter neighbor that routinely brags that he hunts deer with a knife. He has a lot of stories, and this one seemed about as believable as any of them when he told it.
I’ve tried to approach the deer on our land, and I was amazed that moving slowly, most of the year I can get within 20-30 feet before they skitter off. They usually only bound a dozen yards before looking back to see if I’m chasing and then resuming their meal. We have some very trusting deer, and clearly, there are not enough hunters in our neck of the woods to put the fear of the freezer into their minds.
Even at 20-30 feet away, with our very trusting deer, I’m not fast enough to hunt one with a knife. At that range, even the most primitive bow and arrow would be mighty handy. Fortunately, homemade arrows can be made surprisingly quickly with very few tools.
How to Make Arrowheads
Arrowheads can be made out of just about anything workable and durable, including glass, scrap metal, coins, rock or bone. Flintknapping rock requires both the correct type of rock and a great deal of skill and time.
Glass can also be flint knapped if treated like obsidian, and while it’s widely available, it still requires a great deal of skill to learn to shape successfully. Metal or coin-based designs often require power tools, high heat or specialized hand tools.
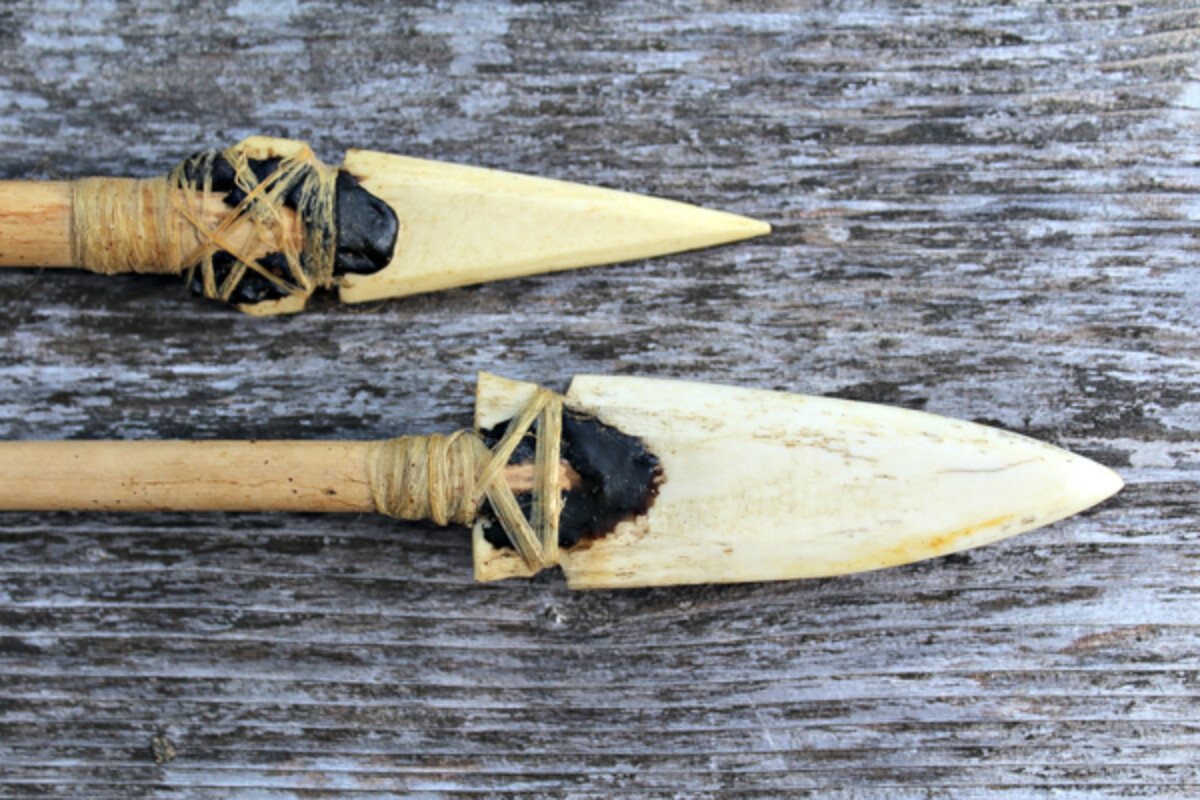
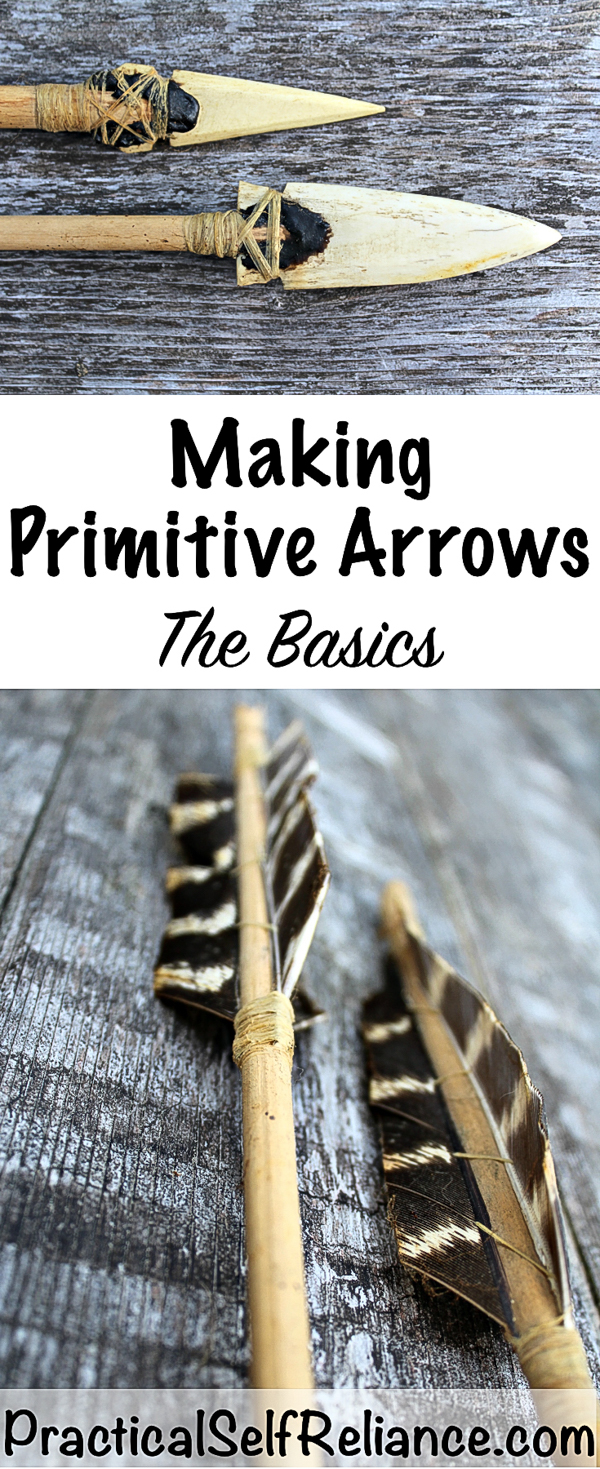
One of the simplest and most durable designs is made from bone, worked against a rock for shaping, no special tools required.
Start with a relatively large broad bone, such as a pelvic bone or shoulder blade. These should be accessible from a local butcher for a cow or pig, or by finding a large road-killed animal like a deer.
Clean the bone as best you can, and then leave it outside for a few days to a few weeks to allow insects to do the rest. It’s best to cage the bone in some way to prevent it from being carried off by large animals but in such a way as to still allow small beetles and ants to work off all the flesh and debris. Try setting it in a “have a heart trap” with the door closed.
Once nature has completely cleaned the bone for you, it needs to be broken into reasonably sized pieces. This can be done by bashing it between a few large rocks, or with a hacksaw or band saw if you have one available.
Mentally plan out your arrowhead, ensuring a good taper to a point, as well as space for notches near the base to attach your arrowhead to a shaft.
Begin working your piece of bone against a large stone, using a bit of water as a lubricant. You’ll be surprised at how easily and quickly you’re able to shape the bone into just about any size of an arrowhead. Both of the arrowheads above were made in about an hour each.
For tutorials on other types of arrowheads requiring more skill, time or tools, try these guides:
Making Arrow Heads: The Art of Flint Knapping
Primitive Ways Flint Knapping Videos

How to Make an Arrow Shaft
Arrow shafts are simple to make, especially if you have access to the right type and size of wood. Thin, straight saplings make excellent arrows.
Recently cut trees will often coppice, meaning that they’ll send up small quick shoots trying to regrow. The stump of an ash tree cut in late winter or early spring may send up a dozen arrow shaft sized coppices, each reaching several feet long by summer’s end.
Other good materials include saplings, Red Osier Dogwood, Blueberry Shoots, Elderberry shoots and many other readily available natural plant materials.
Regardless of the natural material you find, it’ll need to be:
- Clear of knots and twists
- Straight grained
- Long and Straight
- Free of insect damage
Start with the straightest piece you can find, and gently peel off the bark with a knife. Rub it down with some form of oil or fat, and then hold it over a fire. Your goal is to warm it to make it more pliable so you can work it straight.
The oil helps the wood heat without drying out and keeps it pliable. Gently heat your arrow shaft, and work it against a convenient surface (table, rock or your leg) until it’s completely straight. This is by far the most time-intensive part of arrow making.
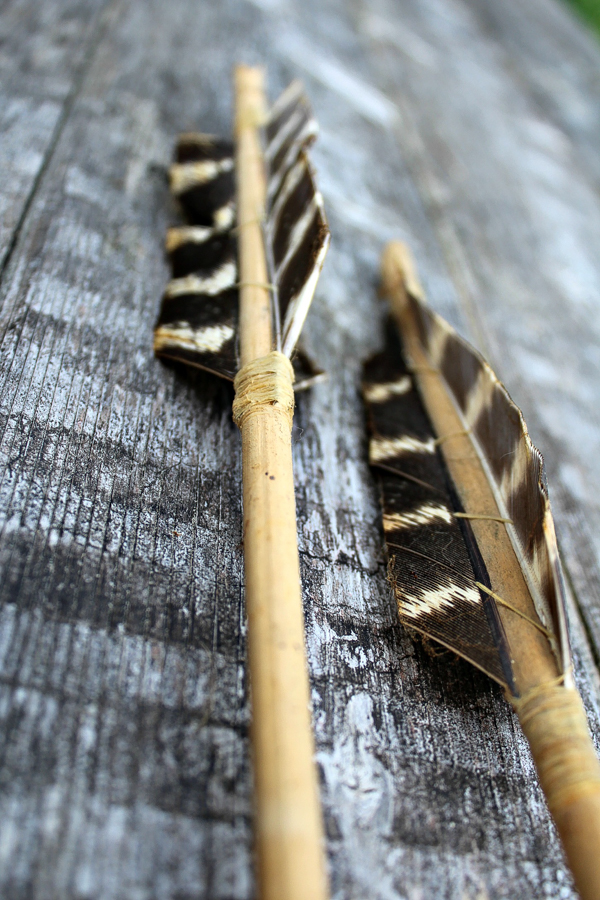
You’ll notice that the shafts in the picture above are not completely straight. These arrows were made a few years ago, and arrow shafts gradually warp over time. Historically, a hunter would have honed his arrow shafts over the fire each night after the hunt, correcting minor imperfections and helping to ensure a successful hunt the next day.
How to Fletch an Arrow
Fletching your arrow is relatively simple. Split feathers will be wrapped onto the shaft with a thin piece of animal sinew. The sinew itself is naturally sticky if you moisten it with your saliva.
The trick is, to have a piece of sinew, you need to have already had a successful hunt. It’s a bit of a chicken and egg problem when you’re building your first arrow.
If you’re looking for practice creating arrows, you can start with a bit of artificial sinew which will get you a lot of arrow practice for just a few bucks long before you’ve had your first successful hunt.
Start with a large primary flight feather, and use a very sharp knife to split it down the middle vein (We use this one). Line up three similarly sized feathers at equal distances around your arrow, and wrap in a spiral pattern with a piece of sinew.
Before you begin wrapping, moisten the sinew by chewing on it for a bit. The enzymes in your saliva help to break down the sinew slightly, making it sticky on the outside.
Wrap the sinew around 10-20 times at the base of each feather (arrowhead side) and then work slowly to the back end of the arrow, gently sliding it through the feather fibers in a spiral pattern. Finish with another 10-20 wraps around the arrow shaft. The tackiness of the sinew moistened with your saliva should glue it in place.
Final Arrow Assembly
To complete your arrow, carve a knock into the tail end so that it can rest on your bowstring. You’ll also need to carve a U-shaped notch into the head of the shaft to allow the arrowhead to attach. The size of your notch will vary depending on the size of your arrowhead, but it should be roughly 1 centimeter deep and about as thick as your arrowhead.
The arrowhead will be attached with sinew and pine pitch resin, which is a glue made by melting pine sap and mixing it with a small amount of charcoal. Apply a dab of hot pine pitch glue inside your notch and insert your arrowhead. Add a bit more pine pitch glue and make sure it’s firmly attached.
Wrap sinew around the notches and around the head of your arrow shaft. Be sure you’ve chewed the sinew to moisten it and make it sticky so that when you finish with a final twist around the shaft, it glues down to itself to finish your arrow.
Now all you need is a bow…I’m writing up that tutorial now, so check back soon. In the meantime, here are a few more primitive skills to keep you busy:
- Processing Soil into Clay for Pottery
- How to Clean and Gut a Squirrel in Under a Minute
- Extracting Salt from Plants for Survival


I live on a small farm in scio while I don’t make arrow heads I do hunt for them.
i mosty find bird points
nice
cool. I think I’m going to make some bone arrowheads and attach them to the arrow with pine pitch and stinging nettle fibers
Sounds great!
Thank your, very timely article as i am working on a homemade slingbow for fishing and hunting. Thanks
Thank you so much for this article! I’m going to print it off as a Christmas gift for my little brother. He’s absolutely fascinated with making his own bow and arrow combo from the original organic materials. The material alternatives will be helpful too. I hope I can also find your “Bow” article as well. Thanks again!
Thank you! I hope your little brother enjoys it!
Nice and very helpful
Cool
Good article Ashley, I was impressed by your approach to the actual way that shafts were straightened and how the attachments were made on the shaft for the arrow points and fletchings. You have been hard at work on your research and “homework” young lady! Using animal grease/fat for a make shift sealer on the wood shafts is a great idea to help minimize drying out the wood and it will also keep some woods more pliable or “in tune” between hunts than simply allowing the wood shafts to dry out. Regarding shafts, don’t overlook some of the alternatives to using traditional wood as the Native Americans did. We now have so much in our “technological inventory” that it boggles the mind sometimes. Have you seen the fiberglas “sticks” that are used in backpacker tents and other outdoors equipment?? Those 1/4″ to 3/8″ diameter rods are perfect for arrow shafts. There are also composite rods that are a part of other types of construction which would serve the same purpose if one simply tunes their thinking toward “How can I use that [insert appropriate part of something that has caught your eye] for off grid living?”, and pretty soon, you will be thinking of all sorts of ways to use common things like old razor blades, kitchen utensils that have served their purpose but can be refurbished into something completely different, etc.. Once you start thinking in those aspects, you will be amazed how differently you will view some common piece of equipment around your home!! Regarding glass as a “raw” material for knapping, it has some positive aspects if you can find some Fire King ovenware that is broken or otherwise rendered unfit for the kitchen. Any tempered glass for use in oven baking can be repurposed for such things as arrow and spear heads if one open their minds to what is right there before them. [But NOT tempered auto glass, which is tempered to a degree which is meant to shatter into tiny shards when impacted]
Good luck and I hope we never have to utilize all of this “off grid” knowledge for other than the fun of it …..
Using old tent poles is a really great idea! You are right, there are a lot of modern things that would make great arrows. I’d love to make an arrow from an old house key like I keep seeing in pictures all over the internet. There are so many options. Thank so much for all those great ideas =)
This is a cool article on how to make an ancient tool that the ancient people loved and needed. I had no idea that there was need for a knock in the tail. My brother might like knowing this since he has also been toying with the idea of getting an archaeological assessment.